Adding Items to Sale
Adding items to a customer transaction forms the foundation of every sale. The system supports multiple methods for item entry, accommodating different scenarios and operational requirements.
Navigation:
Process Sales → Item Search (F9)
Adding Items: Three Methods
Use the method that's fastest for your situation. Most experienced cashiers develop a preference, but flexibility is key -different items and situations require different approaches.
Method 1: Barcode Scan (Fastest - 1-2 Seconds Per Item)
When to use: When the barcode is visible, readable, and not damaged. This is your PRIMARY method -use it whenever possible. Ideal for retail merchandise, packaged goods, and items with standard barcodes.
Why this works: Barcode scanning provides the fastest and most accurate item entry. The scanner reads the barcode automatically (an encoded number), sends it to the system, and the system instantly retrieves the item from inventory with all details (price, description, stock level, etc.).
Step-by-step process:
- Position the barcode clearly under or in front of the scanner -ensure the barcode is in focus (not blurry or at an angle)
- Avoid damaged barcodes: If the barcode is ripped, faded, or torn, the scanner may fail -be ready to use Method 2
- Press the scanner trigger or hold the item in front of the scanner (depends on your scanner type)
- Listen for the beep: A successful scan produces an audible beep (some scanners also have visual feedback like a light)
- Verify the item appeared: The item should appear immediately in your sales list with quantity "1"
- Continue to the next item: Repeat for each item without manual entry
What to expect:
- Success: Beep + item appears in 1 second
- Failure: No beep + nothing appears (try scanning again or use Method 2)
- Speed: Processing 50 items typically takes 1-2 minutes with barcode scanning
Advantages of scanning:
- Fastest method -scanning is 5-10x faster than typing or searching
- Automatic and accurate -zero typing errors, system retrieves exact item
- Minimal manual entry -just scan and move on
- Compatible with most retail products -nearly all packaged goods have barcodes
- Works even during rush -speed is critical during busy periods
- Reduces training for new staff -don't need to memorize item codes
Common issues and solutions:
| Problem | Cause | Solution |
|---|---|---|
| No beep when scanning | Scanner not activated, item out of range, barcode facing wrong direction | Check scanner cable is connected; ensure barcode is directly under scanner lens; rotate item and try again |
| Beep but item doesn't appear | Item not in system, barcode is for different item, system delay | Try using Method 2 (Search) to find the item; verify barcode matches product; contact manager if item needs to be added to system |
| Wrong item appeared | Barcode was from a different product (rare) | Use Method 2 to search for correct item; remove wrong item using F2/Void Item |
| Barcode is damaged or unreadable | Faded, torn, or marked barcode | Use Method 2 (Search) with product name or SKU instead |
| Scanner beeps but nothing happens | Browser lag or network delay | Wait 1-2 seconds; scanner may still be processing; try again if needed |
Method 2: Search by Name or SKU (Most Flexible - 5-10 Seconds Per Item)
When to use: When the barcode is unavailable, damaged, or unreadable; when you know the item name or SKU; when a customer can only describe the item; or when searching across multiple warehouse locations is needed. This is your BACKUP method when scanning fails.
Why this works: The search function enables flexible item discovery by letting you type any identifying information about the product. The system searches its database and returns matching results in real-time. This is the most versatile method because it works with multiple search criteria.
Step-by-step process:
- Press F9 or click the Search Item button on the sales screen
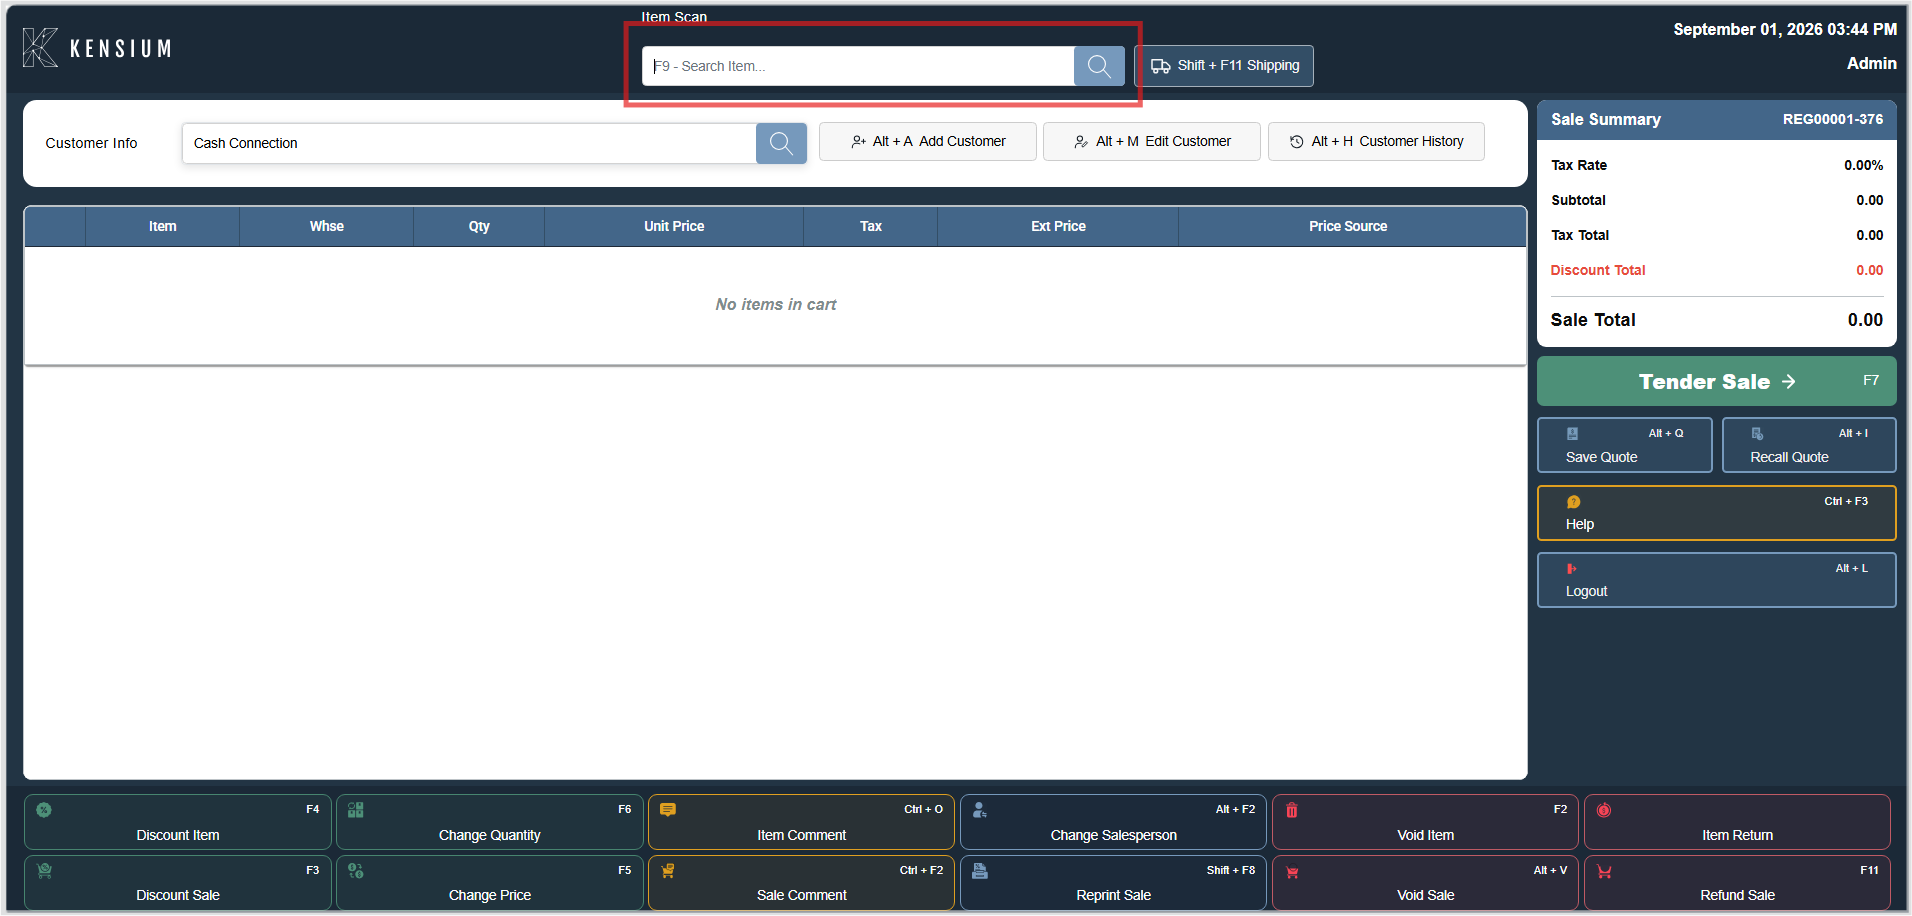
- The Item Search dialog opens displaying a search box and results area
- Type your search term:
- Product name: "Spring hinge", "Fastener", "Bolt"
- SKU: "ITEM-12345" or "PART-789"
- Barcode: "012345678901" (if you want to type instead of scan)
- Partial name: Just "Spring" finds "Spring Hinge", "Spring Washer", "Spring Bolt", etc.
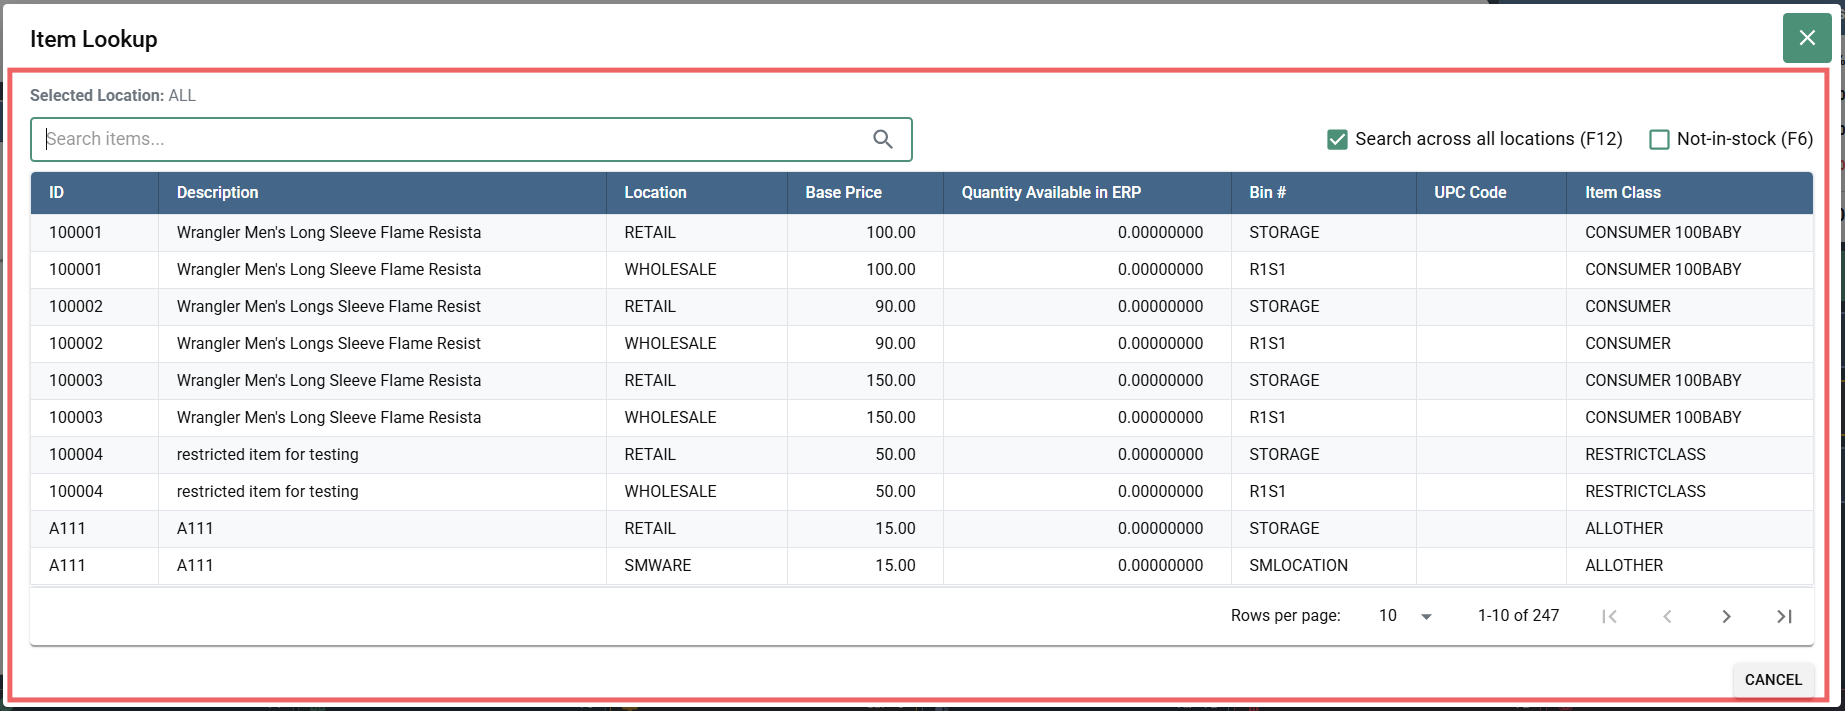
- Results appear dynamically as you type -you don't have to finish typing to see results
- Review the results carefully:
- Look at the "Description" column to verify you have the right product
- Check the "Location" column (RETAIL vs. WAREHOUSE) to ensure stock availability
- Note the "Base Price" column (will show if customer-specific pricing applies)
- Review "Quantity Available" (shows system stock level at that location)
- Click or select the desired item from the results list
- The item is added to your transaction with quantity 1
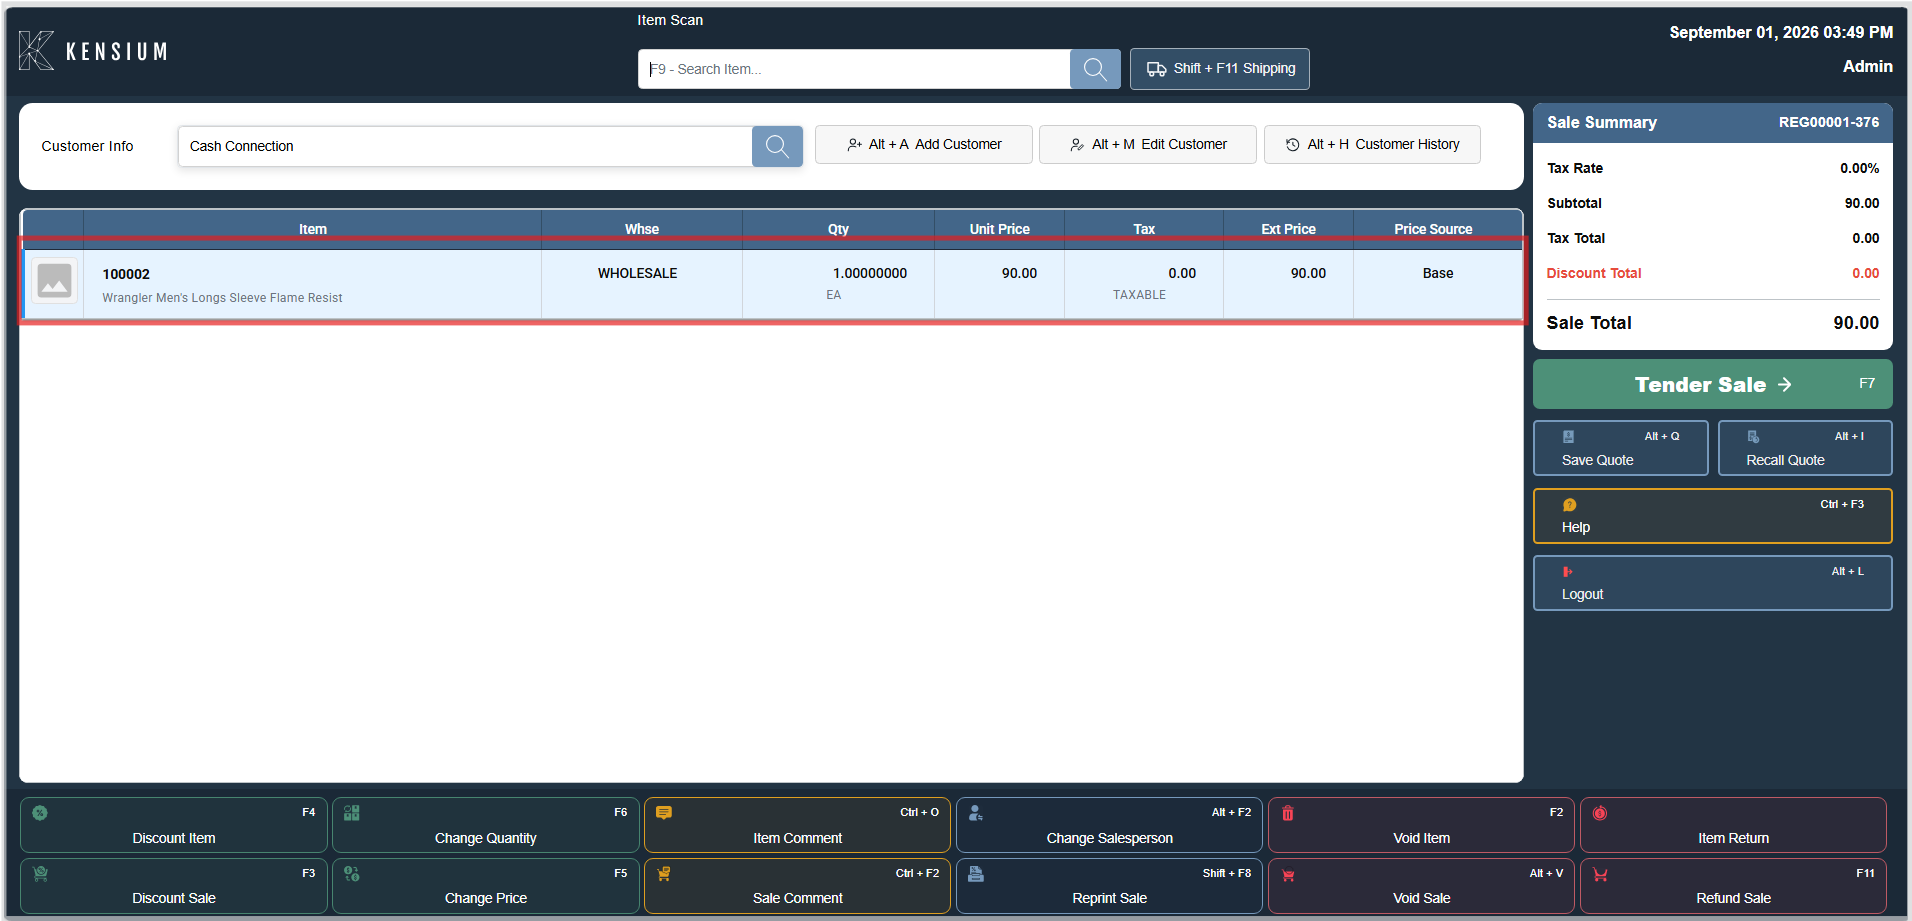
- Quantity can be changed after adding if customer wants more than 1
What the search works with:
| Search Field | Example | What Happens |
|---|---|---|
| Item ID | "ITEM-5432" | System finds the item by its unique product identifier |
| SKU | "PART-789" or "SKU-001" | Searches by the internal stock-keeping unit |
| Description | "Stainless hinge" | Searches product name and description fields |
| Barcode/UPC | "012345678901" | Can search by barcode number if scanning fails |
| Partial name | "Spring" | Finds ALL items containing "Spring": Spring Hinge, Spring Washer, Spring Bolt, Spring Coil, etc. |
| Partial SKU | "PART-7" | Finds all items starting with "PART-7": PART-701, PART-702, PART-799, etc. |
Method 3: Direct Entry
When to use: When you know the exact item ID or SKU, and speed is your priority. This is most useful for experienced staff who have memorized common item codes or for bulk orders with many units of the same item.
Purpose: Direct entry bypasses the search dialog entirely, allowing you to type an item code and press Enter. This is the fastest method for users who know the system's item numbering and for high-volume, repetitive ordering scenarios.
Steps:
- Type the item ID or SKU directly in the item scan/entry box (for example, "ITEM-12345" or "SKU-789")
- Press Enter (the system looks up the item using your entry)
- The item is immediately added to the transaction with quantity 1
- If the item is not found, an error message appears and you can use Method 2 (Search) instead
Keyboard Shortcuts
| Shortcut | Action |
|---|---|
| F9 | Opens the Item Search dialog. |
| Shift+F9 | Repeats the last search. |
| F12 | Searches across all locations. |
| F6 | Shows in-stock items only. |
Available Screen Fields
Item Lookup Dialog:
| Element | Description |
|---|---|
| Selected Location | Shows current location filter (for example, "ALL"). |
| Search Box | Type item name, SKU, barcode, or partial match. |
| Search across all locations (F12) | Checkbox to search across all store locations |
| Not-in-stock (F6) | Checkbox to show out-of-stock items (unchecked by default) |
Search Results Table Columns:
| Column | Description |
|---|---|
| ID | The system's unique item identifier (also called SKU or product number). This is the code you would use for direct entry (Method 3). Use this to quickly identify the product in your system's inventory. |
| Description | The product name and key details (for example, "Spring Hinge - 3 inch Stainless Steel"). This is what helps you verify you found the correct item. Read this carefully to confirm you have the right product before adding. |
| Location | The warehouse or store location where this item is stocked (for example, RETAIL front-of-store, WAREHOUSE back storage, WHOLESALE distribution center). Items can exist in multiple locations with different stock levels. Some locations may have zero stock. |
| Base Price | The standard price per unit for this item in this location. This is the price before any discounts are applied. The transaction price may be different if customer-specific pricing applies. Note that location-specific prices may vary. |
| Quantity Available in ERP | The stock quantity shown in the system for this item at this location. This is the expected available stock based on recent transactions. Note: This reflects system records, which may differ slightly from actual physical stock on hand due to counting delays or entry errors. |
| Bin # | The storage location/bin code where this item is physically stored (for example, "A-15-3" meaning Aisle A, Shelf 15, Position 3). This helps warehouse staff locate the item if it needs to be picked or restocked. |
| UPC Code | The barcode number (Universal Product Code) printed on the product. If the barcode scanner isn't working or the barcode is damaged, you can manually search by this UPC number. This is the 12-digit code printed on the package. |
| Item Class | The product category or classification (for example, "Hardware," "Fasteners," "Tools"). This helps organize items and can affect pricing, discounting, or tax rules. Used for inventory management and reporting. |
Sales List (after items added to transaction):
| Column | Description |
|---|---|
| Item | Product name and description |
| Qty | Quantity of this item in transaction |
| Unit Price | Price per single unit |
| Tax | Tax amount for this item |
| Ext Price | Extended price (Qty × Unit Price) |
Search Filters
Search Across All Locations (F12):
- Default: Checked (searches all store locations)
- When unchecked: Searches current location only
- Use when: Finding items at other store locations
Not-in-stock (F6):
- Default: Unchecked (hides out-of-stock items)
- When checked: Shows out-of-stock items in results
- Use when: Viewing all items including unavailable stock is required
Managing Quantities
Default quantity: When an item is added, the quantity defaults to 1.
To increase quantity:
- Scan the same barcode multiple times, or
- Click the quantity field in the sales list and edit directly.
To change quantity of an existing item:
- Click the item in the sales list.
- Press F6 or click Change Quantity.
- Enter the new quantity.
- Press Enter to confirm.
Having trouble finding items? See the FAQ for error messages and solutions.
Problem: Wrong item added
- Click the item in the sales list.
- Press F2 or click Void Item.
- Search for the correct item and re-add.
Problem: Barcode scanner not working
- Try pressing F9 to use manual search instead.
- Check the scanner cable connection.
- Contact the manager if the issue persists.
Problem: Too many search results
- Use a more specific search term.
- Use item ID instead of name.
- Filter to current location only (disable all-locations search).
- Filter to in-stock items only.
Related Documentation
-
 Sign In
User authentication and register login process
Sign In
User authentication and register login process -
 Process Sales
Complete sales transaction guide
Process Sales
Complete sales transaction guide -
 Changing Item Quantities
Adjust quantities after items are added
Changing Item Quantities
Adjust quantities after items are added -
 Applying Item Discounts
Apply discounts to individual items
Applying Item Discounts
Apply discounts to individual items -
 The Sale Screen
Overview of the sales interface
The Sale Screen
Overview of the sales interface -
 FAQ
Frequently asked questions and error messages
FAQ
Frequently asked questions and error messages
Remember
Barcode scanning provides the fastest item entry method. Search (F9) should be used when the barcode is unavailable. Quantity should be verified before proceeding to payment.