Home Page
The Home Page is the main command center after login. From here, you can process sales, manage your cash drawer, print reports, and access settings. All register functions branch from this single screen.
Navigation:
Login → Home Page (displayed after login)
Available Functions
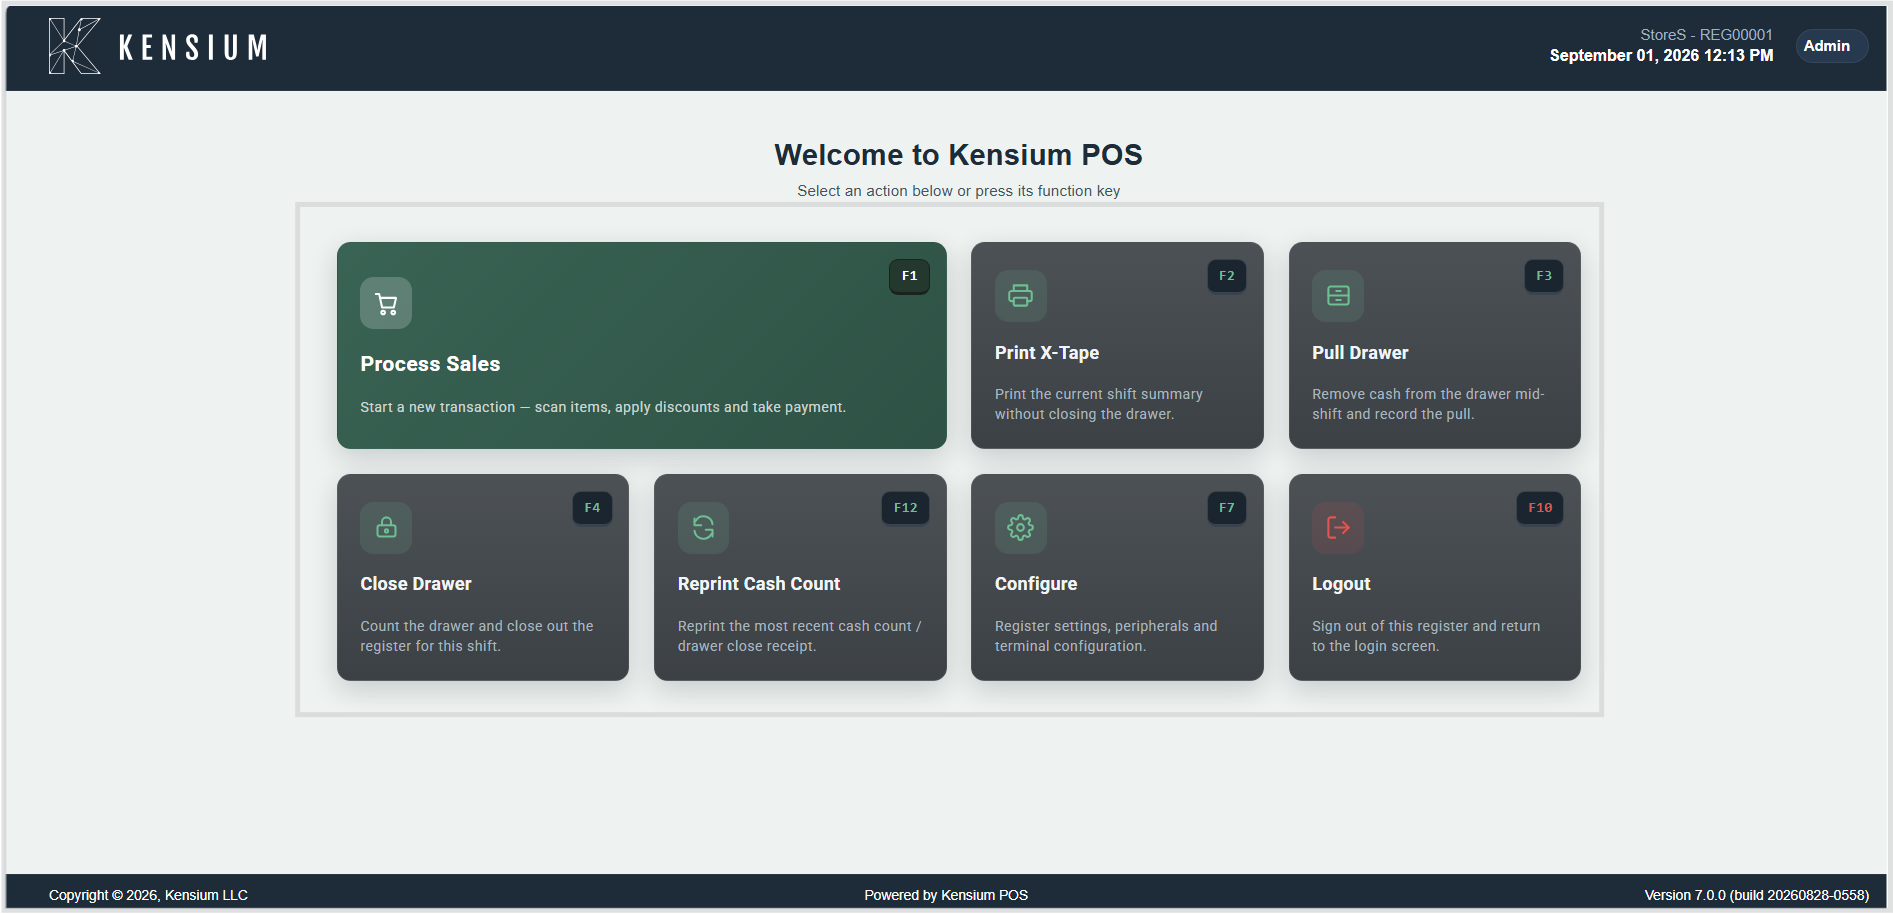
Process Sales (F1)
Start a new customer transaction and open the main point-of-sale interface.
Purpose: This is the primary function for conducting customer sales. It opens the sales screen where all transaction activities occur -adding items, applying discounts, collecting payment, and printing receipts. This function also triggers the drawer opening procedure if not already opened for the shift.
To use:
- Press F1 or click Process Sales
- If the drawer is not yet open, the Cash Count dialog appears (count and verify the starting cash)
- The Item Scan screen opens, displaying the five working regions
- Items are added by barcode scan, name search, or direct entry
- Discounts are applied at the item or sale level if needed
- Payment is collected via the Tender dialog
- Receipt prints automatically
- The sale is complete, and the screen returns to add the next customer
When to use: This is the core workflow for every customer sale. Access it for each new transaction, whether the customer is buying one item or a full basket. The drawer will automatically open on first use of the day.
Important:
This function opens the cash drawer (if not already open) and commits you to that drawer for the remainder of your shift. Coordinate with other cashiers before opening if multiple drawers are available.
For complete step-by-step details: Process Sales
Print X-Tape (F2)
Print a mid-shift summary report without closing the drawer or ending the shift. This is an optional but recommended report.
What is an X-Tape? An "X" report is an interim (mid-point) report that shows all transaction activity from when you opened the drawer up to the moment you print it. The "X" stands for "without closing" -it's purely informational and doesn't lock anything.
Purpose: The X-Tape is a transaction summary report that shows all activity to a specific point in time, without affecting the drawer or closing transactions. It's useful for verification, reconciliation, and providing management with real-time activity snapshots during the shift.
What information the X-Tape shows:
- Transaction count: How many sales/transactions processed
- Sales total: Total dollar amount of all sales (before discounts/refunds)
- Discounts given: Total amount of all discounts applied
- Refunds processed: Total amount of all returns/refunds
- Tax collected: Tax amount on all sales
- Payment breakdown: How much paid in cash, cards, checks, etc.
- Subtotal and totals: Net sale amount after all adjustments
- Running cash position: Expected cash in drawer based on transactions
- Transaction listings: Detail of each transaction (optional, depending on print settings)
Use X-Tape to:
- Verify accuracy: Check that all transactions you remember processing appear on the report
- Check shift totals: Monitor how much you've sold during the day without formally closing
- Reconcile during shift: Confirm expected drawer balance if pulling cash mid-shift
- Provide manager reports: Managers often want real-time activity snapshots, especially during busy periods or for decision-making
- Troubleshoot discrepancies: If something seems off, print X-Tape to identify which transaction is problematic
- Audit high-volume periods: During busy times, print X-Tape periodically to ensure system is recording correctly
- Document before refunds: If processing a large return, X-Tape before and after shows the transaction was recorded
Important characteristics (what X-Tape does NOT do):
- Does NOT close drawer or end your shift -drawer remains open for sales
- Does NOT prevent additional sales after printing -you can continue processing transactions immediately
- Does NOT lock any records -transactions printed on X-Tape can still be modified, voided, or adjusted
- Does NOT require manager approval -you can print X-Tape anytime without escalation
- Creates an audit checkpoint -the printed report shows the exact time and state at that moment, useful for later reference
- Multiple copies allowed -you can print X-Tape multiple times during shift (different tapes showing different points in time)
Timing and frequency:
| Situation | Recommendation |
|---|---|
| Start of shift | Optional -establishes baseline |
| Every hour during busy shifts | Recommended -verifies system stability |
| Before a large return | Recommended -documents status before return |
| After giving large discount | Recommended -confirms discount was recorded |
| Mid-shift cash pull | Recommended -verifies expected balance matches reality |
| End of shift (before close) | Recommended -final verification before formal close |
| During slow periods | Optional -only if you suspect issues |
Example use case: It's 2:00 PM. You've been working 3 hours and sold approximately $2,000 worth of merchandise. Before taking your break, print X-Tape to verify: (1) the $2,000 shows on the report, (2) all major transactions are there, (3) expected drawer balance ($150 open + $2,000 sales = $2,150 expected) seems correct. If all checks out, take break with confidence. If something seems off, investigate before break.
When to use: Use liberally throughout the shift -before breaks, after processing refunds, periodically during busy times (especially if you haven't checked totals in 1-2 hours), or anytime you want to verify balances without formally closing.
Pull Drawer (F3)
Remove excess cash from the drawer mid-shift while maintaining transaction recording. This is a security and cash management function.
What is a drawer pull? A "pull" is the act of removing excess cash from your drawer during your shift for security purposes. Unlike closing the drawer, pulling allows you to remove cash while continuing to process sales.
Purpose: This function enables security and cash management by allowing operators to remove cash from the drawer during the shift without closing it. Each cash pull is recorded in the system audit log, creating a documented trail of when cash left the drawer and by which operator. This is essential for:
- Security -reducing the amount of cash in an open drawer during peak periods (less attractive theft target if drawer only has $500 instead of $3,000)
- Risk management -preventing drawer overflow that could cause cash to fall out or make drawer unsecure
- Compliance -maintaining a complete audit trail of all cash movements (who pulled, when, by system calculation)
- Reconciliation -tracking cash pulls so closing balances are accurate (system knows you pulled $1,500, so it adjusts expected balance)
- Manager oversight -managers can see pull history and know where excess cash went
When to pull cash:
| Situation | Action |
|---|---|
| Drawer getting full ($2,000+ during slow day) | Pull $1,000-1,500 to manager |
| Before high-risk period (opening time, bank break, shift change) | Pull excess to safe |
| After large sale (received $500 cash payment) | May want to pull to make room |
| Security concern (drawer in public area) | Pull to reduce visible cash |
| Manager request | Always comply -manager may need cash for change banks or other registers |
Step-by-step pull process:
- Press F3 or click Pull Drawer from Home Page
- Confirmation dialog appears: "Are you sure you want to pull cash from the drawer?"
- Click Confirm (or Cancel to skip)
- System initiates pull:
- Drawer physically opens (receipt printer controls this)
- System records timestamp, operator ID, and registers the pull event
- Note: System does NOT require you to enter amount -it calculates automatically
- Remove cash physically:
- Take cash out of drawer (you decide how much -typically $500-2,000 depending on drawer fullness)
- Hand to manager or place in secure location as directed
- Close the drawer manually:
- Push drawer closed until you hear it click/lock
- Drawer should be fully closed and secure
- System finalizes the pull:
- Records the action in audit trail
- Calculates how much cash is missing from drawer (the pulled amount)
- Adjusts expected closing balance to account for this pull
- Your shift continues normally -you can immediately process more sales
Important details about pulls:
- Amount is calculated automatically: You don't manually enter how much you pulled. The system figures it out by comparing expected (Opening + Sales - Refunds - Previous Pulls) to actual (what's left in drawer)
- Drawer remains open: Unlike closing, the drawer stays open for your shift -sales can continue immediately
- Each pull is tracked: Every pull appears on your Z-Tape at end of day, showing timestamp and manager who received it (if logged)
- Closing reconciliation accounts for pulls: Your closing count includes all pulls. Example: Expected $3,000, you pulled $1,500, so expected at close is $1,500. When you count $1,498, you're only $2 short (not $1,502 short)
- No reversal: Once pulled, cash is gone -you cannot "restore" a pull (you can ADD cash later with Add Cash function, but not restore a pull)
Multiple pulls in one shift:
- Allowed: You can pull multiple times during a shift
- Each pull recorded separately: System tracks Pull #1 at 10:00 AM, Pull #2 at 1:00 PM, etc.
- Cumulative effect: All pulls add up in reconciliation. If you pull $1,000, then $500, expected closing reflects $1,500 total pulled
After you pull:
- Who receives the cash? Typically the manager or a designated cashier
- Should be documented: Many stores require the manager to sign or initial acknowledgment of cash pulled
- Where does it go? To store safe, manager lockbox, or preparation for end-of-day deposits (varies by store)
- You maintain responsibility: Until formally handed off to manager, the cash is still part of your drawer accountability
Troubleshooting drawer pulls:
| Problem | Cause | Solution |
|---|---|---|
| Can't pull -error appears | System issue or drawer already open | Try again; if persists, contact manager |
| Drawer won't open for pull | Receipt printer offline/not connected | Check printer power and cable; try again |
| Need to pull but no manager | Manager is busy or unavailable | Pull the cash and place in manager's office/safe temporarily; inform manager later |
| Pulled wrong amount | Misjudged how much to take out | Next pull or Add Cash function can balance it out at closing |
Close Drawer (F4)
End the shift and formally close the drawer, finalizing all transactions and reconciling cash.
Purpose: This is the critical end-of-shift procedure that:
- Locks all transactions so no additional sales can be processed
- Requires physical cash counting and reconciliation
- Produces the Z-Tape (formal closing report) for audit and management review
- Creates a complete transaction audit trail for the shift
- Records over/short amounts for accountability
- Releases the drawer for the next operator
Important:
Cannot process new sales after closing. Do not close until all sales for your shift are complete.
To use:
- Press F4 or click Close Drawer
- Confirmation dialog appears requesting verification
- Confirm the close action (this action is irreversible)
- Physically count all cash in the drawer carefully and accurately
- Count all payment methods if using the currency close procedure
- Enter the counted amounts when prompted by the system
- Review the totals and any over/short amounts
- Closing receipts print (including the Z-Tape formal closing report)
- Verify that the Z-Tape printed correctly and is legible
- Secure the cash per store procedures
Critical details:
- The Z-Tape is the official closing report -it must print and be retained for audit
- The closing procedure shows calculated vs. counted balances -discrepancies must be reviewed
- If significant discrepancies appear, alert a manager before finalizing the close
- The process follows either Simple Close (basic count) or Currency Close (detailed denomination count)
- After close, the drawer is locked and cannot be reopened until the next shift
Reprint Cash Count (F12)
Reprint a previous shift's drawer closing count record after the drawer has been closed.
Purpose: This function allows retrieval and reprinting of formal cash count documentation from any prior shift. This is essential for:
- Creating duplicate copies if the original was damaged or lost
- Obtaining a copy for records or manager review
- Verifying closing balances from a specific shift
- Maintaining backup documentation for audit purposes
Use when:
- The close receipt was damaged or didn't print clearly
- You need a copy for your records or the manager
- A previous shift's closing count needs to be reprinted for verification
- Documenting over/short amounts from a specific date
To use:
- Press F12 or click Reprint Cash Count from the Home screen
- The system prompts for a count date (shows today's date by default)
- Enter or select the date you want to search
- Press F3 or click Search
- Results display by time, register ID, and clerk ID
- Select the specific count record you want
- Click Reprint to print the record again
Important:
- Only available after drawer has been closed for that shift
- You cannot reprint a count from an open drawer (the drawer must be formally closed first)
- Multiple counts from the same day are listed separately (if you closed and reopened)
- If no counts exist for the date: "No cash counts found for this date" appears
Configure (F7)
Access register settings, device configuration, and system preferences.
Purpose: The Configure function provides access to hardware and software settings that control how the register operates. These settings typically affect:
- Printer setup and output (receipt printer, report printer, etc.)
- Scanner configuration and barcode settings
- Display preferences and screen layout
- Accessibility options for different user needs
- Language and regional settings (currency, date format, etc.)
- Register defaults and business rules
Most configuration changes should be made by managers or administrators, not during normal operation.
Available configuration options:
- Printer settings (receipt printer, label printer, pick ticket printer assignments)
- Scanner settings (barcode formats, scan speed, beep behavior)
- Display preferences (font size, color scheme, button layout)
- Accessibility options (high contrast, text-to-speech, larger touch targets)
- Language and regional settings (language, currency symbol, date/time format)
- Register class defaults (payment methods, discount limits, tax rules)
Important:
Usually requires manager or admin authorization. Most settings affect all users on the register, so changes should be coordinated with management. Incorrect configuration can disrupt sales processing for all operators.
When to access: Only when specifically instructed by a manager or administrator to make configuration changes. Do not modify settings without authorization.
Log Out (F10)
Sign out from the register and return to the login screen, ending your session.
Purpose: Logging out performs several critical functions:
- Ends your register session and user access
- Releases your drawer assignment so another operator can use it
- Locks all your transactions so they cannot be modified
- Creates a final audit record of your session
- Clears any user-specific settings or pending actions
- Prepares the register for the next operator
Important
The drawer must be closed before logging out. Leaving the drawer open interferes with the next operator. The drawer lock prevents sales processing by other users until it is formally closed.
To use:
- Press F10 or click Log Out
- System confirms: "Are you sure you want to logout?"
- Click Confirm to proceed (or Cancel to return to Home)
- System returns to the login screen
- Your session is ended
Important
- Logging out does NOT automatically close the drawer -you must run Close Drawer (F4) first
- If you log out without closing, the next operator will see an error and cannot open the drawer
- Always coordinate with the next operator before closing and logging out
- Leaving the register unattended without logging out is a security risk
Keyboard Shortcuts
| Key | Action |
|---|---|
| F1 | Process Sales |
| F2 | Print X-Tape |
| F3 | Pull Drawer |
| F4 | Close Drawer |
| F7 | Configure |
| F10 | Log Out |
| F12 | Reprint Cash Count |
Related Documentation
Remember
The drawer must be closed before logging out. Keyboard shortcuts (F1-F10, F12) enable faster work. The drawer must be closed at the end of a shift before handing off to the next operator.