Shipping
Configure shipping when goods are not walking out with the customer. The shipping screen sets the destination, date, carrier, and fulfillment method for the sale.
Navigation:
Process Sales → Shipping (Shift+F11)
Shipping enables you to:
- Set delivery destinations and carrier information
- Choose fulfillment methods (Carry out, Pick up, Ship, Install)
- Enter freight and installation charges
- Create pick tickets and ERP orders
- Generate invoices for shipped goods
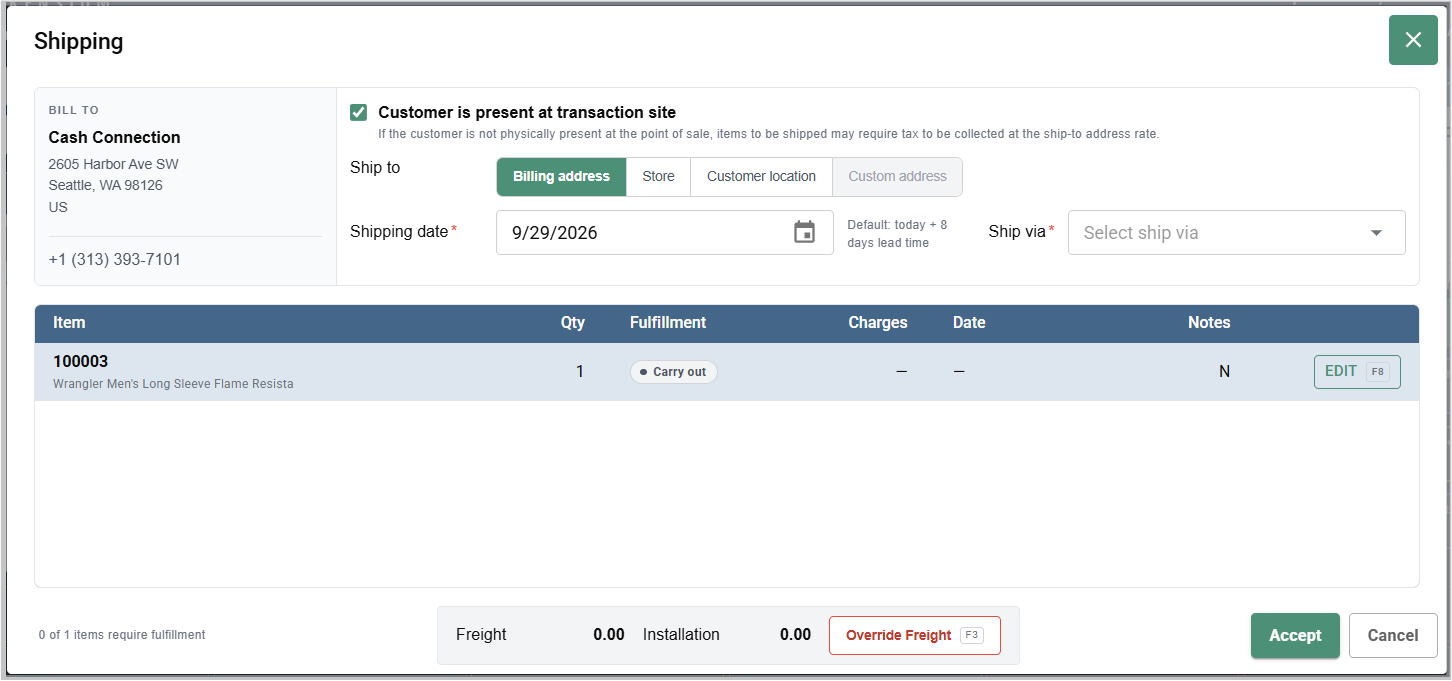
Opening the Shipping Screen
To open the Shipping screen:
- Add items to the sale first (Shipping requires items)
- Press Shift+F11 or select Shipping from the header
- The Shipping screen opens with the customer billing information and configuration options
Fulfillment Methods
Each item can have one of four fulfillment methods:
| Method | Description | Effect |
|---|---|---|
| Carry out | Customer takes the item now | No charge field, no ERP fulfillment |
| Pick up | Item collected from store after sale | Prints pick ticket automatically |
| Ship | Item shipped to customer via carrier | Adds freight charge, creates ERP order |
| Install | Item requires installation/service | Adds installation charge, creates ERP order |
Configuring the Shipping Screen
Bill To (Read-Only)
Displays the attached customer name, address, country, and phone. To change this information, use Edit Customer on the Sales screen, not here.
Customer Is Present at Transaction Site
Check this box if the customer is physically at the register. If unchecked:
- All Carry out and Pick up items automatically change to Ship
- These fulfillment methods are disabled for individual items
- Tax may be collected at the ship-to address rate instead
Ship To Destination
Select where the items should be shipped:
| Option | Use When |
|---|---|
| Billing address | Ship to customer's main address on file |
| Store | Ship to this store location |
| Customer location | Ship to a saved customer location (create/edit without leaving) |
| Custom address | Ship to a one-time address (if ERP supports it) |
Shipping Date
- Required field
- Defaults to today + configured lead time
- Past dates are rejected
- Example: "Default: today + 8 days lead time"
Ship Via (Carrier)
- Required field
- Select the shipping carrier from the dropdown
- Lists available carriers from your ERP system
Items Grid
The grid shows all items in the sale with columns for:
- Item: SKU and description
- Qty: Quantity ordered
- Fulfillment: Current fulfillment method (Carry out, Pick up, Ship, Install)
- Charges: Freight or installation charges
- Date: Scheduled delivery/installation date
- Notes: Associated with this item (Y/N indicator)
- Edit: Press F8 or click EDIT to modify the item
The footer displays:
- Count of items requiring fulfillment
- Freight total
- Installation total
- Override Freight button (F3)
Setting Fulfillment for Each Item
To edit an item's fulfillment:
- Click the item in the grid or press ↑ ↓ to select it
- Press F8 or click EDIT to open the Item Fulfillment screen
- Configure the following:
| Field | Description |
|---|---|
| Item | Read-only: SKU, description, quantity, weight |
| Fulfillment Method | Select: Carry out, Pick up, Ship, or Install |
| Freight Charge | Enter amount if shipping (disabled for Carry out/Pick up) |
| Installation Charge | Enter amount if installing (disabled for Carry out/Pick up) |
| Scheduled Date | Date for delivery/installation (if Ship or Install) |
| Notes | Add special instructions for this item |
| Apply to All | Copy these settings to all items on the sale |
- Click Save to confirm changes
- Navigate between items using ‹ Previous and Next › or PageUp/PageDown
- Press Ctrl+Enter to accept and save all changes
Freight & Installation Charges
Freight Charges
- Enter manually on Ship items (no automatic rate calculation)
- Total in footer shows sum of all per-item freight charges
- Weight is shown for reference only
Override Freight: Press F3 to set a single freight total instead of per-item amounts
- Replaces all per-item freight charges
- Editing an item's freight amount afterward cancels the override
Installation Charges
- Enter on Install items only
- Totaled separately in footer
- Not affected by freight override
- Not included in sale-wide discounts
Important
Freight and installation charges are added as separate lines to the invoice. If these don't appear after accepting, verify they were entered correctly.
Using Customer Locations
When you select Customer location as the Ship To destination:
- Click the Select location dropdown
- Choose from the customer's saved shipping locations
- Click New to create and save a new location for this customer
- Click Edit to modify an existing customer location
Creating a new customer location:
- Enter location details (address, city, state, ZIP)
- Assign a unique Location ID (e.g., "Office", "Warehouse", "Retail Store")
- Click Save
- The location is saved to the customer's profile and available for future orders
Note:
When selecting Custom address as the Ship To destination:
Required fields:
- Address
- City
- State
- ZIP code
Optional fields:
- Address Line 2 & 3
- Country (changing clears State; re-select from list)
- Attention (recipient name)
- Phone
To save as customer location:
- Enter an Address ID (unique per customer)
- The address saves to customer's location list
- Available for future orders
- Synced to ERP
Note:
Addresses are not validated against postal databases. Verify accuracy before accepting.
Pick Tickets
When any item has fulfillment set to Pick up:
- A pick ticket prints automatically when the sale completes
- Ticket shows customer info, items, quantities, and storage locations
- Prints to the Pick Tickets printer (usually the report printer, not receipt printer)
- Only pick-up items appear on the ticket
If printing fails, verify the printer assignment in register preferences.
Important Notes
- Shipping creates an Invoice, not a Receipt: Any shipping information converts the document to an invoice
- Ship and Install create ERP orders: These fulfillment methods send items to the warehouse fulfillment queue
- Shipping is optional at tender: The system doesn't require opening the Shipping screen. Make it part of your counter procedure for shippable items
Shipping issues? See the FAQ for error messages and solutions.
Related Documentation
Remember
Always verify the ship-to address before accepting. Freight and installation charges are not included in sale-wide discounts. Opening the Shipping screen converts the receipt to an invoice. Make opening Shipping part of your procedure for shippable items.