L0001 - Testing in VirtualBox
This article describes how use the Oracle Virtual Box virtual machine to test POS and its components.
We'll be configuring a virtual network and computing environment that mimics clients that use Windows Server to manage their networks. Specifically we will configure the following:
- Two virtual machines: one for a Corporate Server, and one for a Store Server.
- The virtual machines share a virtual network so that they can communicate with each other.
- The Corporate Server implements an Active Directory service that provides user management, DNS, and certificate services (TLS).
Preparation
- Download and install VirtualBox from Oracle:
- Only the platform package is required (extensions are not required).
- Confirm system requirements first.
- Right-click the installer and choose Run as administrator.
- Download a Windows Server ISO disc image:
- Ensure you have access to a SQL Server instance.
- We recommend installing SQL Server Developer Edition on your host machine.
- Express Edition can be used, but Developer Edition supports larger test data sets.
- SQL Server can be downloaded here.
- Alternatively, a SQL Server instance on the Kensium network can be used.
Corporate VM
The full installation process is documented online; although more recent Virtual Box versions may slightly change the user interface presented in that article.
Create Virtual Machine
Open VirtualBox to create a New virtual machine:
- General Settings:
- Name:
Corporate. - ISO Image:
(leave blank) - Type:
Microsoft Windows - Version:
Windows Server 2025 - Hardware settings:
- Base Memory:
4096 MB(less if your workstation does not have adequate memory) - Processors:
1 CPU - Virtual Hard Disk settings:
- Create a virtual hard disk with a size of
100 GB.
Do not start the virtual machine yet.
Networking
NAT Network
We will create a NAT Network (network address translation) for our VM. This approach will enable us to isolate Active Directory services on the virtual network so that they will not conflict with the physical host's network.
This mode enables the following types of communications.
- VM to host (and internet)
- VM to VM
- Host to VM, but only if port-forwarding is configured (to specific services on specific VMs)
The first step is to create the NAT Network:
- Select the File > Tools > Network Manager menu (or press Ctrl-H).
- Select the NAT Networks tab.
- Press the Create button.
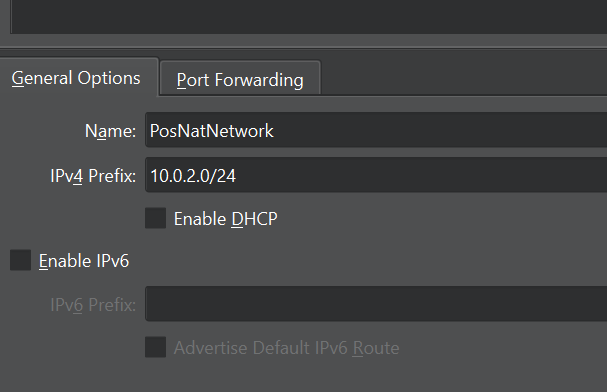
- Enter the following field values:
- Name should be
PosNatNetwork. - IPv Prefix should be
10.0.2.0/24. - Enable DHCP must be unchecked.
Warning
The Enable DHCP option must be unchecked as our Active Directory implementation will enable its own DHCP service.
The NAT network settings should look something like the following:
Now, we want to configure port forwarding to enable the VMs to communicate to your SQL Server instance:
- Select the Port Forwarding tab.
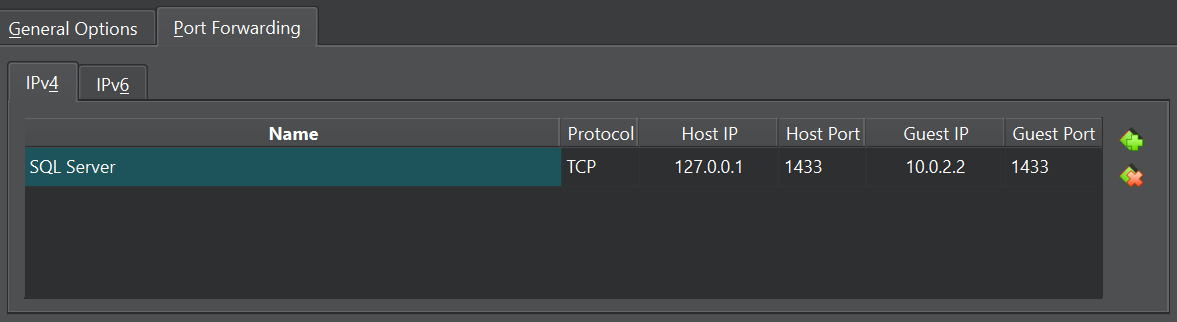
- Create a new port forwarding rule:
- Name should be
SQL Server. - Protocol should be
TCP. - Host IP should be
127.0.0.1(assuming SQL Server is on your host machine). - Host Port should be
1433. - Guest IP should be
10.0.2.2. This is the database server IP address that will be used when configuring POS in the VM. - Guest Port should be
1433.
The port forwarding rule should look like the following:
Configure VM Network
The next step is to configure the VM to use this NAT Network.
- Open the Settings for the VM.
- Choose the Expert tab/mode.
- Choose the Network section.
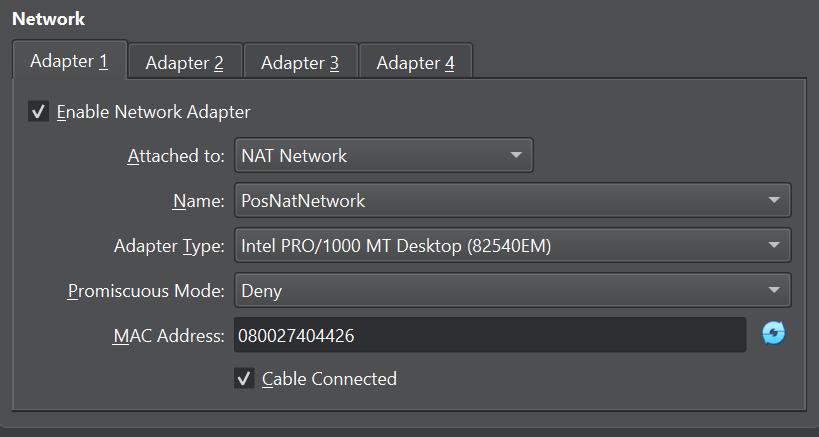
- Choose NAT Network for the Attached To field.
- Select PosNatNetwork for the Name of the NAT network.
The VM's network settings should look like the following:
At this point we start the VM to install Windows Server.
Note
The VirtualBox documentation includes a full reference for network settings.
Install Windows Server
Before starting the virtual machine, mount the Windows Server ISO to the VM:
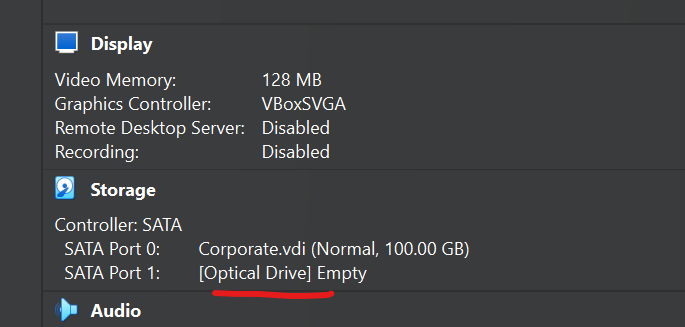
Then cllick Start to start the virtual machine and proceed with the Windows Server installation. Answer the Installer questions using the default answers, with the following exceptions:
- When prompted to select an Image, choose
Windows Server 2025 Evaluation (Desktop Experience). - When prompted to enter a Password, enter
Kensium2025!.
After completion, the Installation process will restart the VM and ask you to login.
Install Guest Additions
After installing Windows Server, and before configuring server options, add VirtualBox Guest Additions to the VM. This component will enable easier data and file exchange between the VM and your workstation.
For full information and installation instructions see:
Configure Active Directory
The next step is to configure Windows Server Active Directory (AD) services. AD is used to manage a Windows network, and is often used by clients. We can emulate a simple client network for testing purposes by setting up a simple AD deployment.
See the L0002 knowledge base article and follow its instructions to configure the AD Domain Services services on the Corporate server. Domain Services will manage the virtual network computers and users.
Then, follow the L0003 article to install AD Certificate Services (just the installation instructions are sufficient at this point). Certificate Services will be used to manage the TLS/SSL certificates that POS uses to communicate amongst its components in the virtual network.
Install POS
At this point, you can install the Kensium POS software.
See Server - Legacy for more information.
Store VM
TODO
Add write-up for configuring the Store VM, including Active Directory server management.