L0002 - Test with Active Directory
This article describes how configure an Active Directory environment that mimics how clients use Windows Server to manage their networks.
The recommended way to test Active Directory is to set up a virtual network using the VirtualBox virtualization software. However, these instructions can be used in any networking environment, whether it be an isolated physical network or implemented through the Amazon EC2 service.
Note
See L0001 for more information on how to configure VirtualBox to test POS.
For this example, we assume that IP addresses are for a 10.0.2.0/24 subnet (the recommended subnet for the VirtualBox virtual network). IP addresses should be changed if you are testing on a different subnet, such as an EC2 or physical network environment.
Another consideration is for domain and computer names; we are assuming a certain configuration based on a VirtualBox virtual network. These names might need to be tailored for a client environment.
Resources
A web search will provide several resources can be used to understand how Active Directory should be configured. Some links include:
Static IP
The next step is to configure a static IP address for the virtual server (a static IP is recommended best-practice as the server will be running Active Directory and DHCP, which will be configured later).
- Use Windows Search to open View Network Connections.
- Open the default Ethernet connection and click the Properties button.
- In the Ethernet Options window that opens, double-click the Internet Protocol Version 4 item to open it.
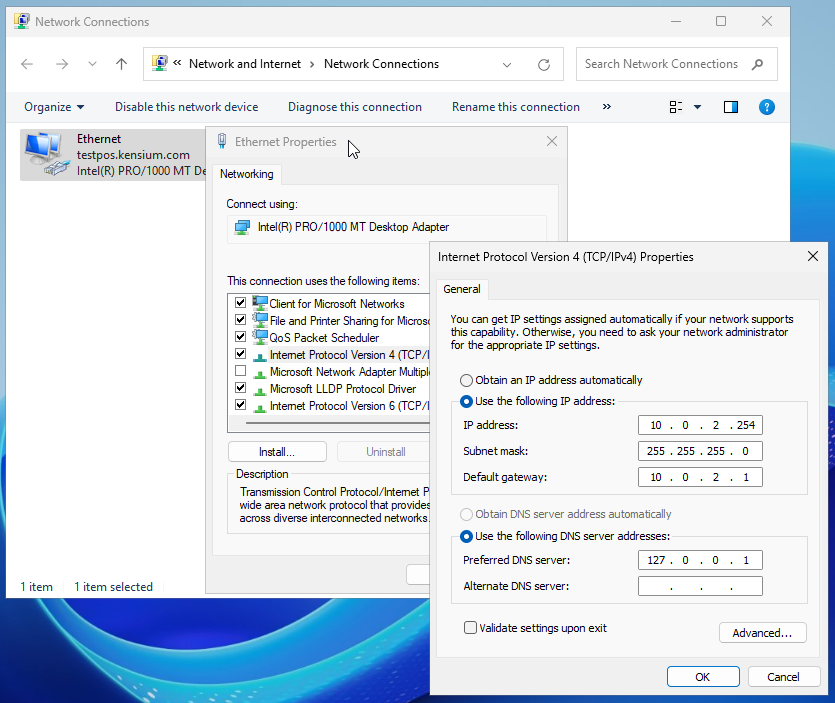
- Manually enter the following settings:
- IP Address should be
10.0.2.254. - Subnet Mask should be
255.255.255.0. - Default Gateway should be
10.0.2.1. - Preferred DNS Server should be
10.0.2.254.
The settings should look like:
Note
We are setting the DNS Server to the server's IP address, as we will be adding DNS services later. Note however that you may see network warnings (e.g. not being able to identify the server) until the DNS service is configured; these warnings are normal.
Computer Name
The next step is to change the server's name so that it more accurately reflects the server's purpose.
- Find File Explorer through the start menu or Windows search.
- Right-click to display its popup menu, and select the Properties menu.
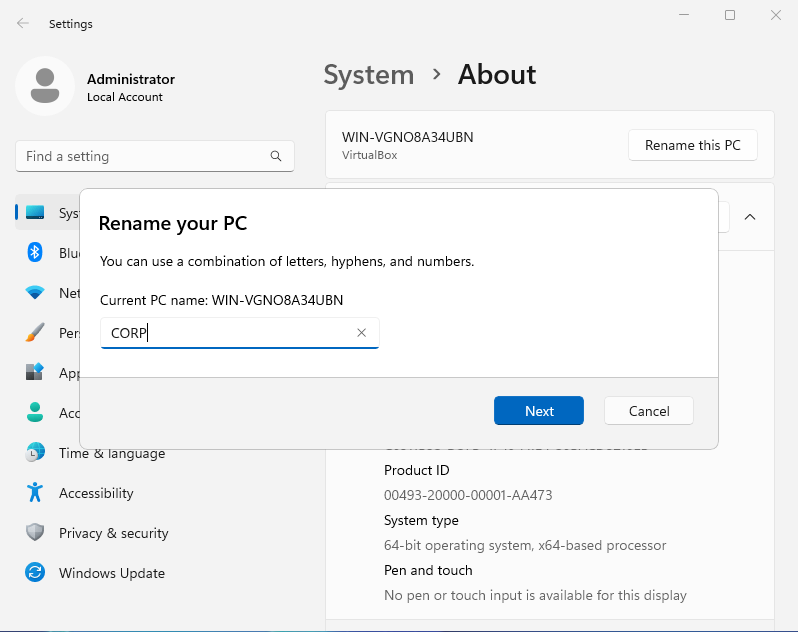
- In the System > About screen, press the Rename this PC button.
- Enter the name
CORP- this will be the name computer name.
The settings screen should look like the following:
When prompted, restart the server so that the name change takes effect.
AD Domain Services
The next step is to install Active Directory Domain Services (domain services help manage Windows users and other Windows servers, such as store servers).
- Open Server Manager.
- Select Add Roles and Features.
- The wizard will show the Select installation type page.
- Select the Role-based or feature-based installation option.
- The wizard will show the Select destination server page.
- Select the current server (e.g.
CORPin the server list page that appears). - The wizard will show the Select server roles page.
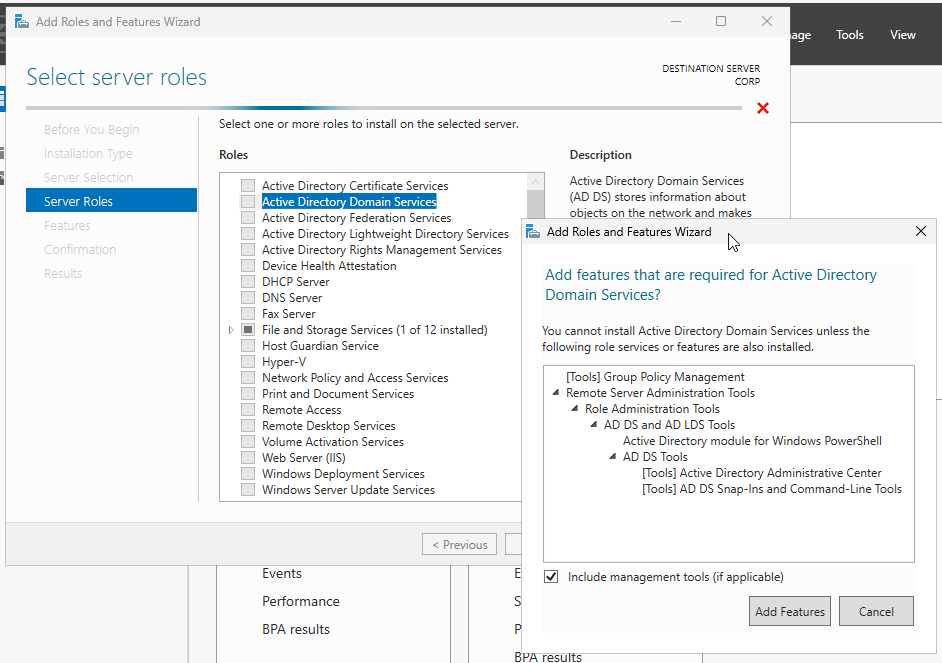
- Select the Active Directory Domain Services role.
The wizard will display the following page:
Then:
- Click Add Features to continue.
-
This will add the listed features and enable the Active Directory domain services.
-
Click the Next button on the wizard to display the Select features page.
- You can accept the default features and click Next until the wizard displays the Confirm installation selections screen:
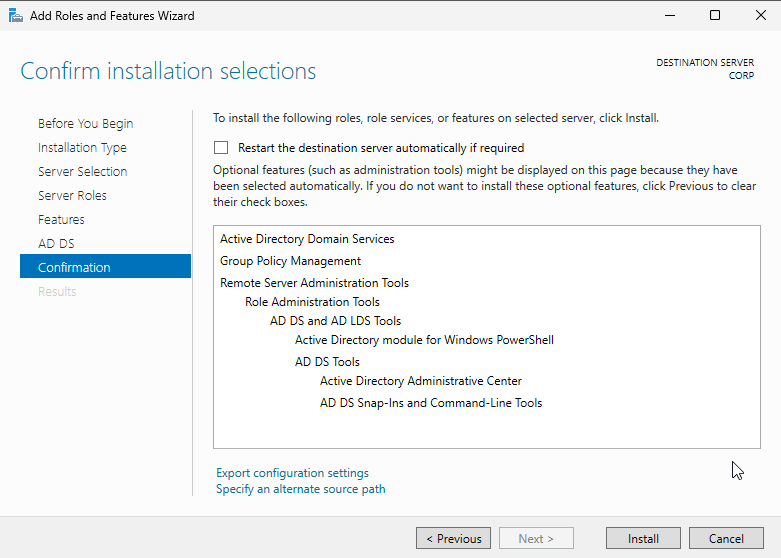
Click Install to complete the installation, and close the wizard once installation is completed.
Configure Domain Services
After installation, AD Domain Services must be configured. The Server Manager will indicate that there are outstanding notifications; click the notification to display the next step:
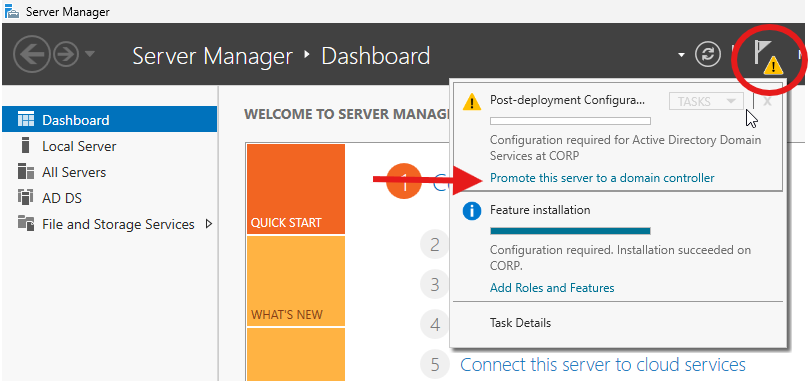
Click the Promote this server to a domain controller to configure Domain Services. This action will display another configuration wizard, starting with the Deployment Configuration page:
- Select the Add a new forest deployment option.
- Enter
testpos.kensium.comfor the Root domain name field.
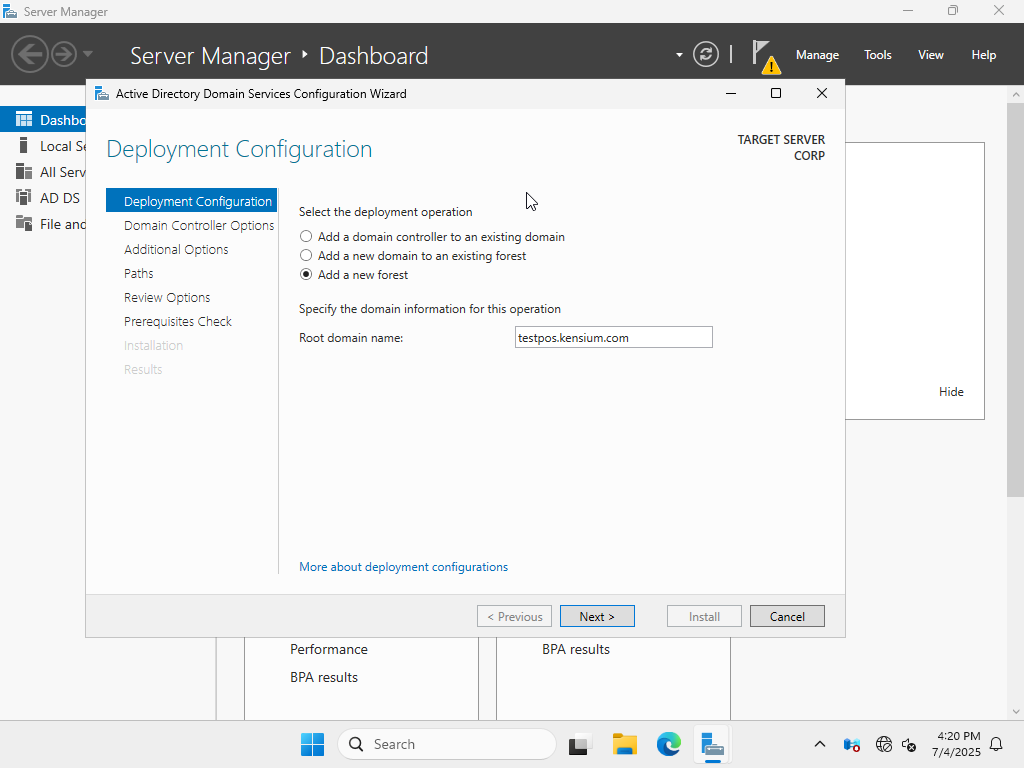
Click Next to show the Domain Controller Options page:
- Accept the default settings.
- Enter
Kensium2025!for the restore mode password:
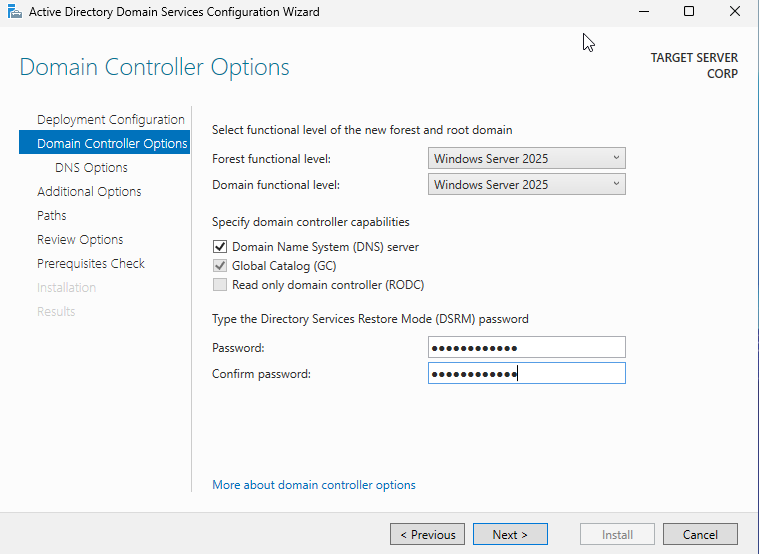
Click Next to show the DNS Options page. The default settings can be used, so click Next again to show the Additional Options page:
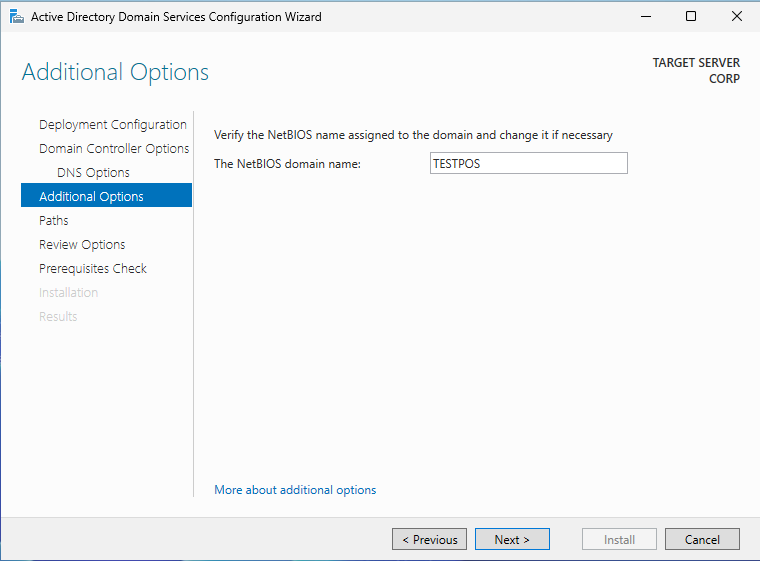
The default NetBIOS value can be accepted (e.g. TESTPOS). Click Next, accepting defaults until the wizard shows the Prerequisites Check page:
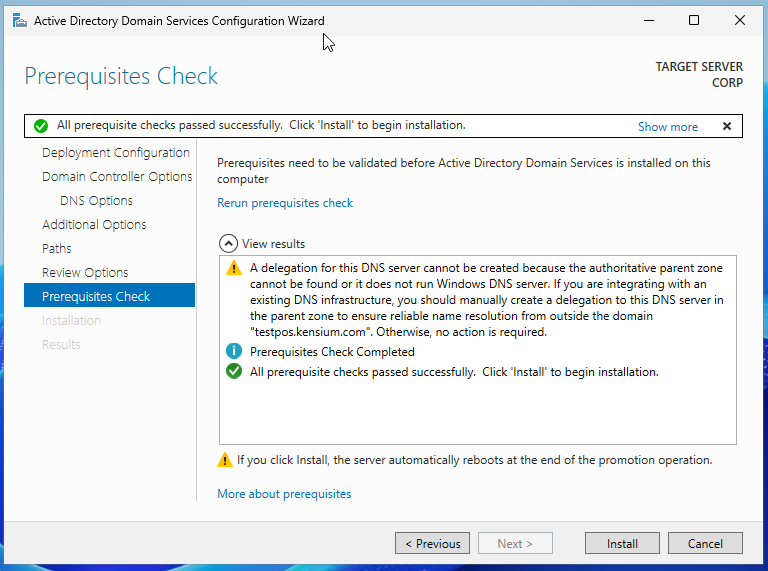
Ensure that the prerequisite checks have passed successfully. Note that the DNS delegation warning is acceptable and can be ignored. Click Install to complete the configuration; the server will be restarted.
DNS
The next step is to configure DNS. While the AD Domain Services installation has already configured most of the DNS settings, there are a few things to update.
Reverse Lookup Zone
A reverse lookup zone must be configured in order to enable the DNS Server to resolve IP addresses to fully-qualified host names.
- Open Server Manager.
- Open the Tools > DNS menu to display the DNS Manager window.
- Expand the server node (e.g.
CORP), right-click the Reverse Lookup Zones child node, and select the New Zone menu. This action will display the New Zone Wizard. - Click Next to go to the Zone Type screen.
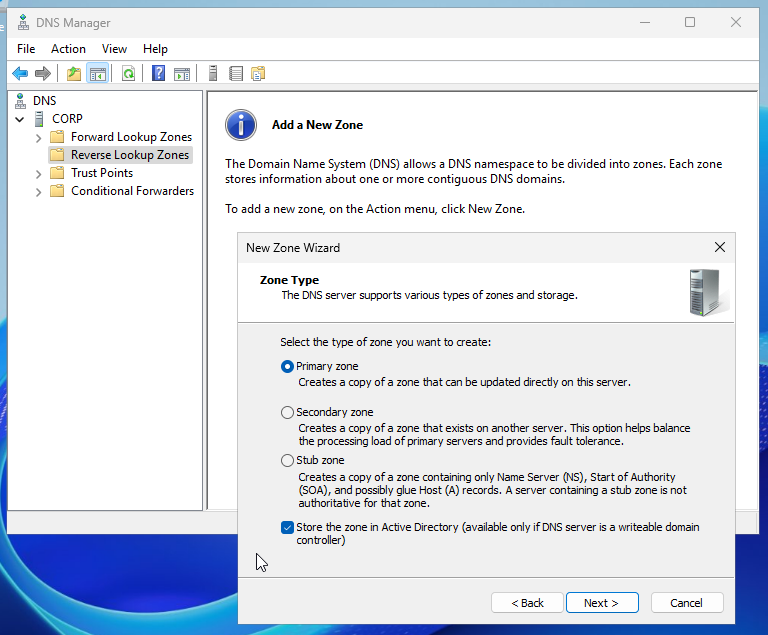
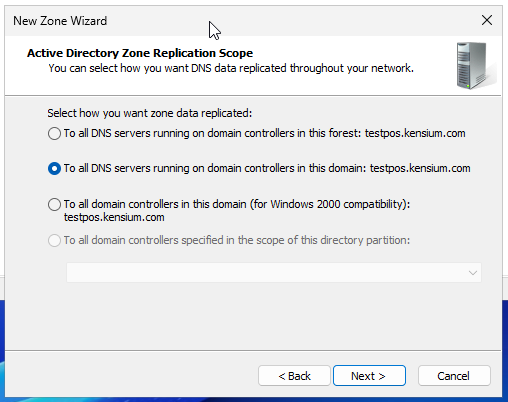
- Select Primary Zone and click Next to go to the Active Directory Zone Replication Scope page.
- Accept the default selection to replicate to all domain servers:
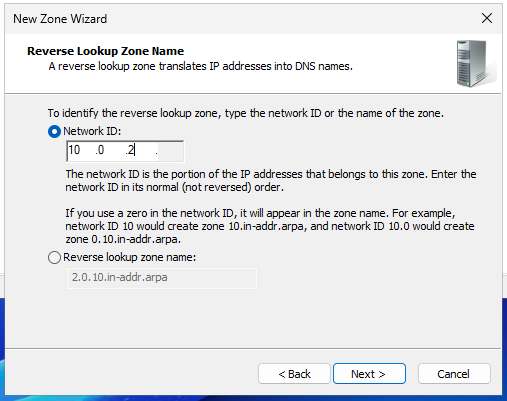
- Click Next to continue, select IPv4 Reverse Lookup Zone, and then click Next again to show the Reverse Lookup Zone Name page.
- Enter
10.0.2as the Network ID:
- Click Next and accept the default secure dynamic update option, and click Next again and Finish to create the new zone.
Resolve Name Server
Select the newly created reverse lookup zone, and open the Name Server entry. Check the resolved IP Address for the name server; if it is unknown then click the Edit... button to update the IP address:
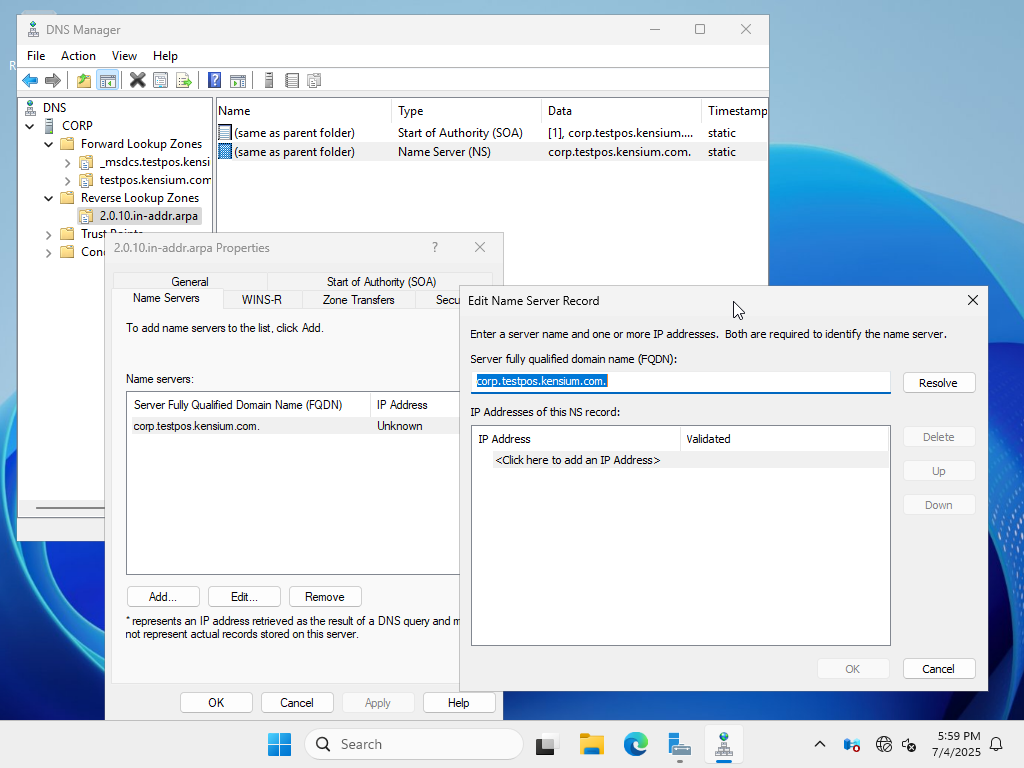
Press the Resolve button to apply the IP address (e.g. 10.0.2.254) and accept the changes.
Repeat this check on the name servers of the Forward Lookup Zones and resolve their IP addresses if necessary.
PTR Record
A PTR record must be created to support the reverse lookup of the name server's IP address.
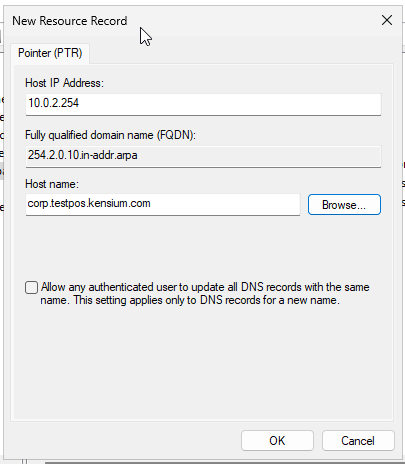
Right-click the reverse lookup zone and select the New Pointer (PTR) menu. Supply the following fields:
- Host IP Adress should be
10.0.2.254, the IP address of the server. - Host name should be
corp.testpos.kensium.com, the fully qualified host name of the server. You can use the Browse button to get this value from the forward lookup zone name server entry if you wish.
DHCP Service
The server should be configured with the DHCP service, which is used to dynamically assign IP addresses to other devices on the network.
Note
The DHCP Quickstart guide on Microsoft Learn provides a full reference on how to enable DHCP.
First, use Server Manager to install the DHCP Server role. You can use the default installation options for all wizard pages.
The Server Manager will display a notification that DHCP must be configured:
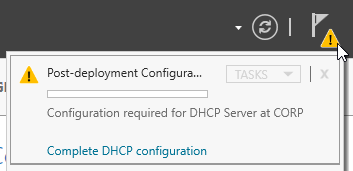
Select Complete DHCP configuration to show the DHCP configuration wizard. Navigate through the wizard and accept all default options to complete the configuration.
DHCP Scope
The next step is to configure a DHCP scope, or a block of IP addresses that will be dynamically assigned by the DHCP service. Generally, the block should exclude any IP addresses that are already statically assigned to resources (such as the network gateway and the domain controller server).
To continue the VirtualBox virtual network example, we'll configure a block of dynamic addresses from 10.0.2.100 through 10.0.2.200.
- Open Server Manager again, and select the Tools > DHCP menu.
- Expand the node for the server (e.g.
corp.testpos.kensium.com) and select the IPv4 child node. - Right click that node and select the New Scope menu to display the New Scope wizard.
- Enter a name for the scope (e.g.
TESTPOS_DHCP) and click Next to go to the IP Address Range page:
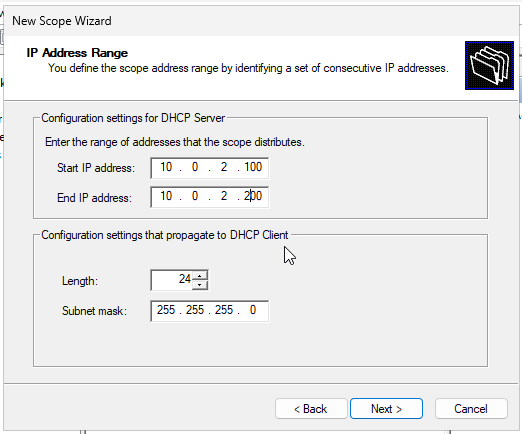
Enter the network details, for example:
- The Start IP address should be the start of the IP range, e.g.
10.0.2.100. - The End IP address should be the end of the IP range, e.g.
10.0.2.100. - The Subnet mask should reflect the network subnet mask, e.g.
255.255.255.0for the VirtualBox virtual network. - This value will be sent to DHCP clients and must match the subnet mask used on the network.
- Note the Length field will be updated automatically when you enter this value.
Click Next to advance through the remaining pages on the wizard.
-
Exclusions within the range can be entered, if there are a few IP addresses within the range that should be reserved for static IP addresses.
-
The Lease Duration can be set to 5 days, if desired.
-
Select Yes when prompted to Configure DHCP Options.
-
The Router (Default Gateway) should be set to the network default gateway.
-
For the VirtualBox virtual network, this value would be
10.0.2.1.
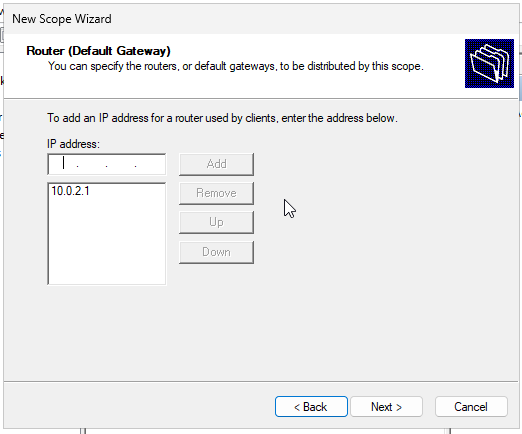
- The Domain Name and DNS Servers page defaults should already have the correct DNS entries picked up from the DNS service. For example:
- The Parent Domain would be
testpos.kensium.com. -
The
10.0.2.254should be already entered as the DNS server's IP address. -
The WINS Servers page can be skipped.
- Select Yes when prompted to Activate Scope.
At this point the DHCP service should now be configured.
Domain Users
The next step is to configure domain users in Active Directory Domain Services. For testing POS to mimic real-life experience, at least one domain user should be created with standard permissions.
Warning
Testing of daily POS operations should be performed using a domain account with standard Windows permissions. As per Windows security best-practices, clerks should not run POS with administrative permissions.
To create a domain user with standard Windows permissions:
- Open Server Manager.
- Select the Tools > Active Directory Users and Computers menu.
- This action will display the Active Directory Users and Computers window.
- Expand the node for your domain (e.g.
testpos.kensium.com). - Right-click the Users child node and select the New > User menu.
- This action will open the New Object - User dialog.
- Enter the user's identifying information on the first screen; for example:
- First Name can be
Ima. - Last Name can be
Clerk. - Username can be
clerk.
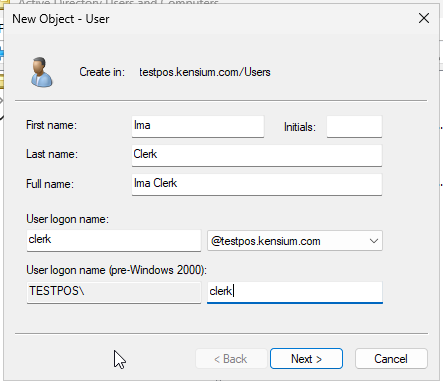
- Click Next to advance to the next page to enter a password:
- Enter a Password; for example
Kensium2025!. - Ensure the Password never expires checkbox is checked.
- Ensure the User must change password at next logon checkbox is not checked.
- Click Next and then Finish to create the new user.
Warning
Checking the Password never expires option is not recommended for production environments; however this can be set in a testing environment to help simplify testing.
This action will create a domain user and assign the account to the standard Domain Users Windows security group.
Other Test Cases
The configuration described above will configure Active Directory for base-line test cases that are common to most clients running Windows networks.
Active Directory has many configuration options and topologies; the Microsoft documentation can be explored in more detail to support more advanced test cases.