L0003 - AD Certificate Services
This article describes how to configure and use Active Directory Certificate Services to manage the TLS/SSL certificates that are used by POS to secure communications amongst its components.
Note
Managing TLS/SSL certificates is part of any IT organization's PKI (public key infrastructure). There are several ways to manage PKI, but this article focuses on the Active Directory Certificate Services implementation as it is a suitable choice for many client networks, and for internal Kensium virtual test environments.
This article requires that Active Directory Domain Services are already configured in the network environment. The article also also assumes we are configuring a test environment; however, it indicates where configuration might differ for production environments. For more information, see:
- L0001 for more information on how to configure a test environment using the VirtualBox virtualization software.
- L0002 on configuring Active Directory in a test environment.
Resources
A web search will provide several resources can be used to understand how Active Directory Certificate Services should be configured. Some links include:
Installation
AD Certificate Services must be installed once (on one server) in an Active Directory network. In a test environment, this server can be the domain controller configured during Domain Services configuration, and share responsibilites with the RMS Corporate Server.
Note
In a production environment, as a best-practice Certificate Services should be installed on a different Windows server from the domain controller. However, Active Directory planning and resource scoping is out-of-scope of this article, and is typically performed by a client's IT staff.
In any case, Active Directory Domain Services must be fully configured on at least one domain controller in the Active Directory network prior to installing Certificate Services.
To install Certificate Services, use Server Manager to install the Active Directory Certificate Services role. You can use the default options and navigate through the wizard until the Select role services page:
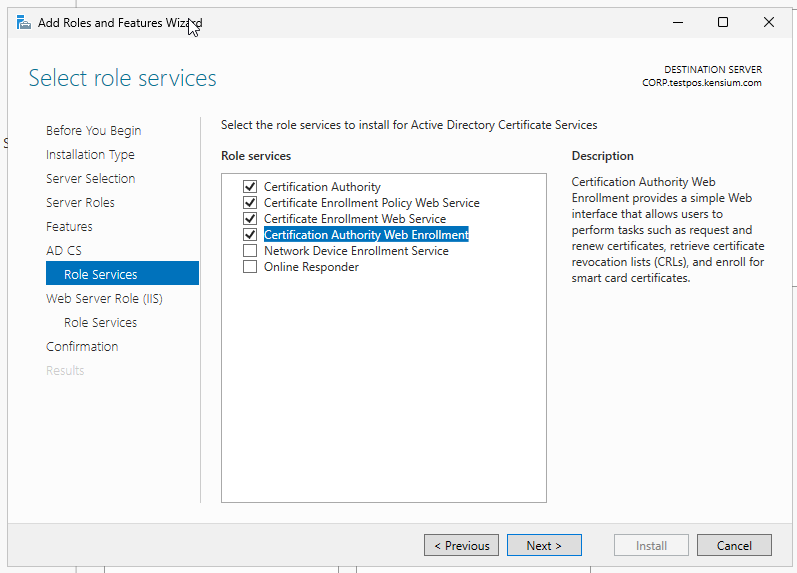
You should ensure the top four services are installed, as illustrated in the above image. You can advance through the rest of the wizard (accepting any defaults) to complete the installation of the role and its services.
Note
The Certificate Services installation also installs the IIS web server application on the server. Certificate Services uses IIS in its workflows to create new TLS/SSL certificates, amongst other activities. IIS will be installed regardless of whether the server will be used to host the RMS Server of POS.
Configuration
After installation, the Server Manager will display a notification that Certificate Services must be configured:
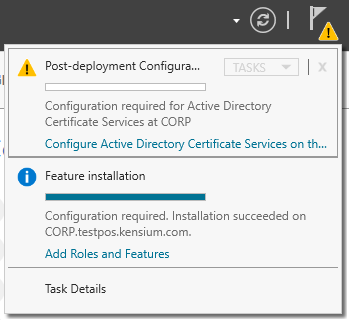
Select Configure Active Directory Certificate Services to show the AD CS Configuration wizard.
Certification Authority
Then:
- Ensure the Credentials are correct - the default domain administrator (e.g.
TESTPOS\Administrator) is usually the best choice. - Select the Certification Authority service to configure first (this role must be configured before the other services):
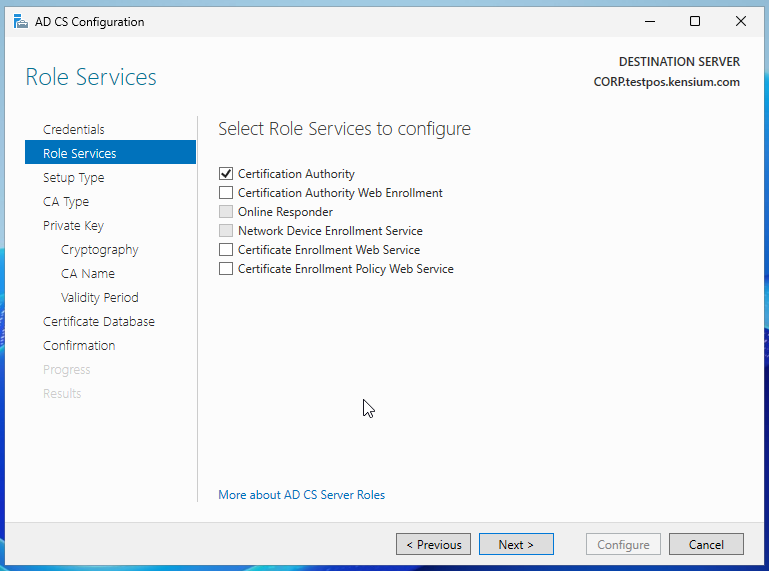
- Advance through the wizard.
- For the Setup Type, ensure
Enterprise CAis selected. - This option will integrate the Certification Authority service with Active Directory Domain Services.
- For the CA Type, ensure
Root CAis selected. - This option identifies this server as the root certificate authority for the organization, which will be signing any TLS/SSL certificates that are created for internal network resources such as RMS web servers.
- Ensure
Create a new private keyis selected for the Private Key page. - Accept the default options for the remaining pages:
- Cryptographic Options - typically the
SHA256key option is acceptable. - CA Name - the name of the Certificate Authority, as specified on any certificates that are created. The default (e.g.
testpos-CORP-CA) is acceptable but can be changed if desired. - Validity Period - the date in which the CA signing certificate is considered valid; the default 5 years is acceptable.
- Database Locations - the file path where certificates are stored. The default is acceptable (in production environments these folders should be included in automated backups).
- Complete the configuration.
Once configuration of the Certification Authority service is complete, the wizard will prompt whether additional configure is required. Choose Yes to configure the remaining certificate services.
Other Services
The AD CS Configuration wizard appears again. Choose all of the remaining services to configure:
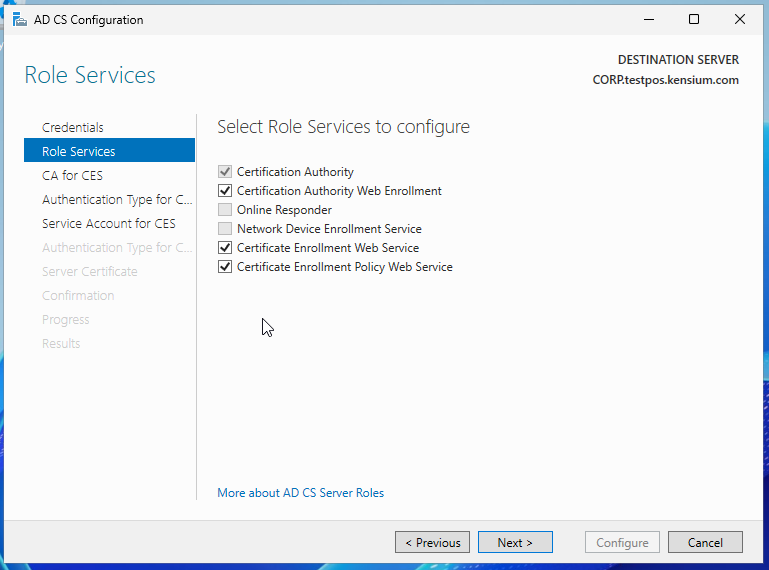
Advanced through the next pages in the wizard to configure Certificate Enrollment Services (CES):
- In the CA for CES page, keep the defaults (
CA Nameoption is selected). - In the Authentication Type for CES page, keep the defaults (Windows Integrated Authentication).
- For the Service Account for CES page, check
Use the built-in application pool identityoption.
The next page in the wizard will configure Certificate Enrollment Policy Web Services (CEP):
- In the Authentication Type for CEP page, keep the defaults (Windows Integrated Authentication).
The next page configures the server certificate:
- In the Server Certificate page, select the SSL certificate that Certificate Services created for this server (e.g.
CORP.testpos.kensium.com).
Warning
Do not select the CA signing certificate (e.g. testpos-CORP-CA) as the signing certificate cannot be used to secure HTTPS web pages. If you select this certificate, any attempt to access HTTPS web pages in your web browser will return HTTPS warnings/errors indicating the "Common Name is invalid".
You can now advance through the rest of the wizard to complete the configuration. You should see a final page indicating that configuration succeeded.
Create SSL Certificates
Once the Active Directory Certificate Services (AD CS) are configured, you can create SSL certificates for use within the Active Directory domain. SSL certificates are required for any RMS server installation at store locations and the corporate location.
Note
If the Corporate server is installed on the same machine as AD CS, a default SSL certificate may already be generated by the Certificate Services configuration process. You can choose to continue using this SSL certificate, or generate a new one with a longer expiry period if desired.
The SSL certificate creation process consists of three overall steps:
- Create a certificate request on the web server.
- Use the AD CS server to process the request and create a signed SSL certificate.
- Apply the signed SSL certificate to the web server.
Wildcard SSL Certificate
There are two approaches to managing SSL certificates for an organization. One approach is to create an SSL certificate for each server. The other is to create one wildcard SSL certificate that can be applied to multiple servers.
We will describe the wildcard approach as it is slightly easier to use and manage the certificate once it is created.
Create a Certificate Signing Request (CSR)
The first step is to create a CSR on the web server that is hosting RMS Server (a Store or Corporate server).
Open the Certificate Management Console through the following steps:
- Press Windows Key + R, type mmc, and press Enter.
- Go to File > Add/Remove Snap-in.
- Select Certificates, click Add, choose Computer Account, and click Finish.
Then create the CSR:
- Navigate to Certificates > Personal.
- Right-click on Personal, select All Tasks > Advanced Operations > Create Custom Request.
- This action will display the Certificate Enrollment wizard.
- Choose Proceed without enrollment policy and click Next.
- Use the default Template and Request Format options and click Next.
- In the Certificate Information screen, expand the Details of the Custom request item, and click Properties.
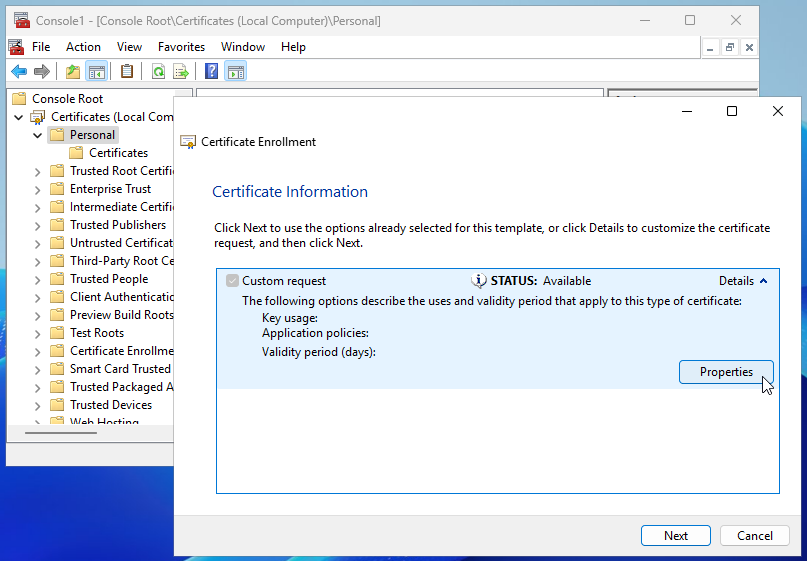
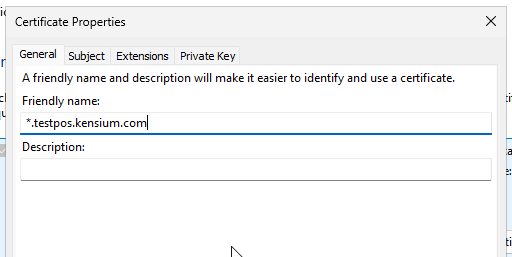
This action will display the Certificate Properties dialog. Then:
- Under the General tab, set the Friendly Name to
*.yourdomain.com. - For a virtual network using VirtualBox, for example, this value would be
*.testpos.kensium.com.
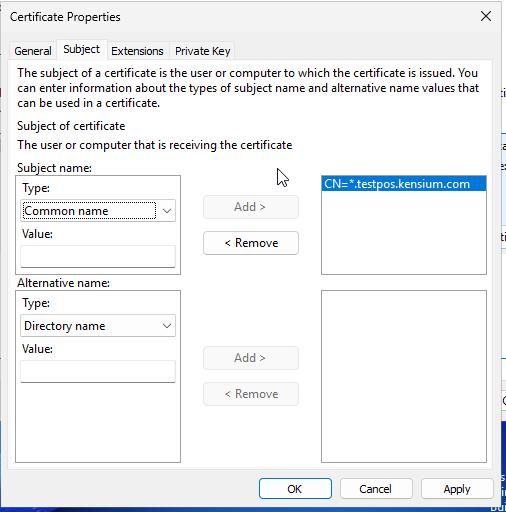
- Under the Subject tab, set the Common Name (CN) to
*.yourdomain.com. - For a virtual network using VirtualBox, this value would again be
*.testpos.kensium.com.
Note
The common name (CN) is the value that web browsers check to ensure that HTTPS communications are secure and intended for a particular web server, as identified by their fully qualified host name. A wildcard certificate is exactly the same as a regular certificate with one difference: a CN of *.testpos.kensium.com (for example) instructs the browser that ANY server on the testpos.kensium.com domain can use the certificate; whereas a CN of store1.testpos.kensium.com indicates that only the server located at store1.testpos.kensium.com can use the certificate. The steps for creating a wildcard versus a regular SSL certificate are identical outside this difference in the Common Name.
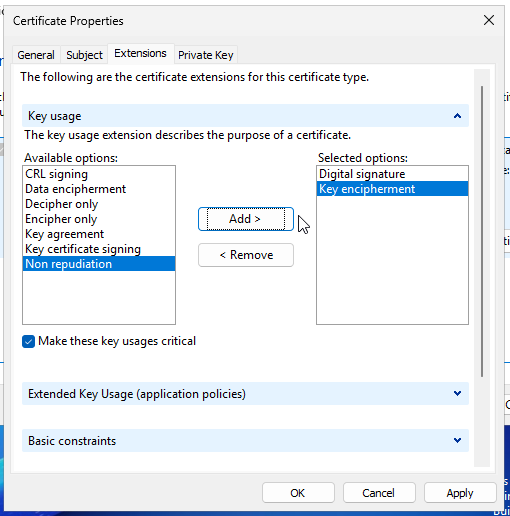
- Under the Extensions tab and Key Usage section, add Digital Signature and Key Encipherment.
- Under the Private Key tab, ensure the key is exportable and set the key size (e.g.,
4096 bits).
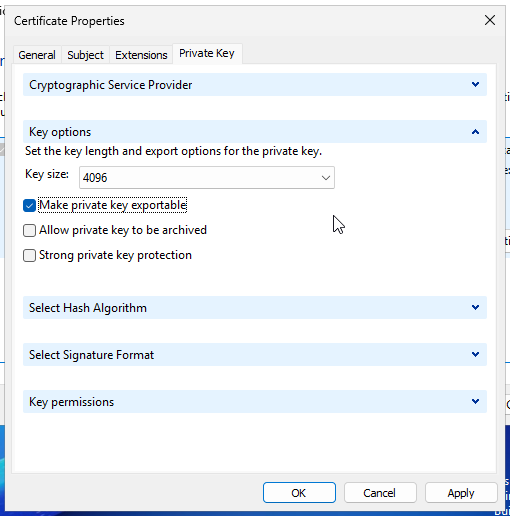
Click Ok to close the dialog and continue in the Certificate Enrollment wizard.
Finally, save the CSR file in Base 64 format.
Submit the CSR to AD CS
Open your web browser and navigate to the AD CS web enrollment portal. This is usually the CertSrv URL on the server that is running the portal. For example, in a VirtualBox testing network this would be the https://corp.testpos.kensium.com/certsrv URL.
Important
The URL should point to the web server that is running the the Active Directory Certificate Services web enrollment portal. For our VirtualBox test examples, this happens to also be the Corporate Server; however in production environments this could easily be a web server other than the Corporate Server.
You will be prompted to enter credentials. Enter the Windows domain administrator credentials to proceed. Then:
- Select the Request a Certificate link.
- Then select the advanced certificate request link.
- In the Submit a Certificate Request or Renewal Request page, enter the following:
- Copy and paste the contents of the CSR file you previously created into the Saved Request field.
- Select Web Server for the Certificate Template.
- Click the Submit button and then download the new certificate in Base 64 format.
At this point you have created a new wildcard SSL certificate; this must be applied to the server that originally requested it.
Apply the SSL Certificate
Return to the Certificate Management Console, or if it is not open, open it with the following steps:
- Press Windows Key + R, type mmc, and press Enter.
- Go to File > Add/Remove Snap-in.
- Select Certificates, click Add, choose Computer Account, and click Finish.
Right-click on Personal, select All Tasks > Import, and import the SSL certificate file. Confirm that the certificate will be placed in the Personal store:

Export as PFX
The final step is to export the wildcard SSL certificate as a PFX file. This file will enable us to apply the SSL certificate to other servers in the Active Directory domain.
Return to the Certificate Management Console to perform the following steps:
- Expand the Personal > Certificates nodes.
- Select the SSL certificate that was just added (e.g.
*.testpos.kensium.com). - Right-click on the installed certificate, and select the All Tasks > Export menu.
This action will display the Certificate Export Wizard. Navigate through the wizard and select the following options:
- Select the Yes, export the private key option.
- Accept the default PFX export file format option.
- Add a security option to the PFX file. This can be a password, but in an Active Directory network the best approach is to specify an Active Directory user or group such as the domain administrator:
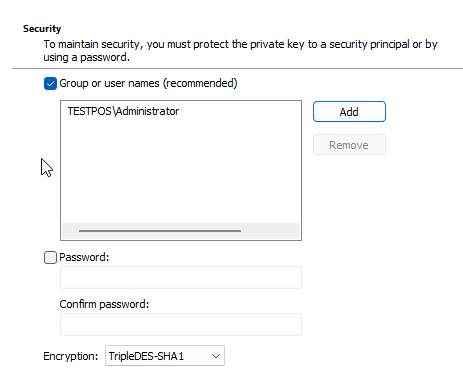
You can then complete the wizard to save the PFX file.
Warning
In a production environment, always remember to store the PFX file in a secure file location.