L0004 - Apply an SSL Certificate
The RMS Server Installer is the easiest way to assign the SSL certificate to the web server used by RMS Server. During the installation process, the Installer program has an option to select the SSL certificate as a PFX file.
That said, this article describes how the SSL certificate can be applied manually. A manual install may be required or desired if installing RMS on a web server that already has web applications, or if manually renewing an SSL certificate that is about to expire, for example.
Note
The SSL certificate can be created in several ways. If POS is installed on network running Active Directory, the recommended approach is to use Active Directory Certificate Services (AD CS). The steps to configure AD CS and generate the PFX file for the SSL certificate are described in L0003.
The first step is to install the SSL Certificate through a PFX file if necessary. The second step is to bind the certificate to the web server running RMS Server.
Note
If you have already installed the SSL Certificate as part of a certificate enrollment process (such as described in L0003), this step is not necessary.
Install PFX Certificate
Open the Certificate Management Console with the following steps:
- Press Windows Key + R, type mmc, and press Enter.
- Go to File > Add/Remove Snap-in.
- Select Certificates, click Add, choose Computer Account, and click Finish.
Right-click on Personal, select All Tasks > Import, and import the SSL certificate file. Confirm that the certificate will be placed in the Personal store:
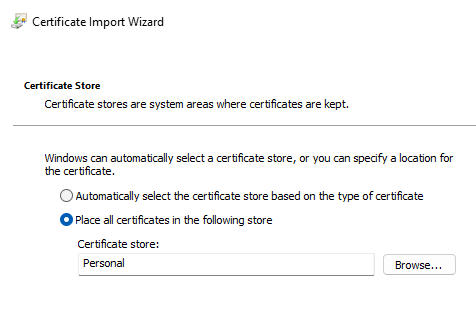
Continue through the wizard pages to complete the certificate install.
Bind to IIS Web Site
Once the SSL certificate has been installed on the server computer, it can be bound to the web site(s) hosted by the server.
- Open the IIS Manager application and select the web site that should be protected through SSL.
- Right-click the web site, and select the Edit Bindings menu.
This action will display the Site Bindings window.
Check whether a https binding already exists; if it doesn't, proceed to add a binding (otherwise, edit the binding).
Add Binding
In the Site Bindings window, click the Add button to display the Add Site Binding window. Enter the following options:
- Ensure the Type is set to https.
- In most cases, the IP Address can be left at All Unassigned.
- This value indicates that traffic any IP address bound by the server will be handled by the binding.
- In some production environments where the server may belong to multiple TCP networks - e.g. in a network DMZ - it might be more appropriate to select a particular network interface.
- Ensure the Port is 443.
- The HostName can be left blank in most cases.
- This value is only set for specific cases when host-header resolution is used to differentiate multiple web sites on the same server.
- Choose the wildcard certificate that was installed previously.
- For example, for a VirtualBox virtual server the certificate name would be
*.testpos.kensium.com.
The binding information should look like the following:
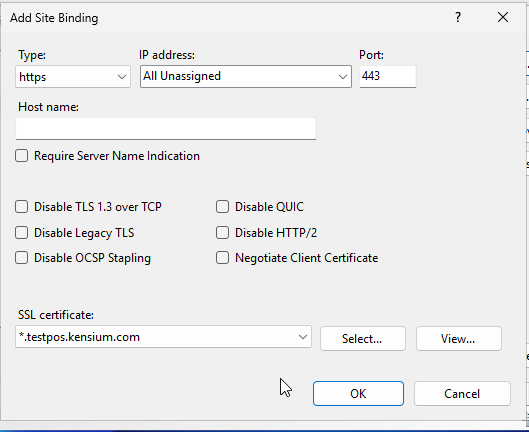
Click the OK button to save the binding.
Edit Binding
You may need to edit an existing https binding for several reasons:
- A web site has already been created on the server and has other (non-RMS) applications.
- One example of this is when you install RMS on a test environment that also has AD CS installed on it; AD CS uses IIS to host several of its web applications).
- RMS is already installed and you want to renew the web site's SSL certificate because it is about to expire.
To edit the https binding, in the Site Bindings window, click the Edit button to display the Edit Site Binding dialog.
The options in the Edit Site Binding dialog are identical to the Add Site Binding dialog, except that the Type field cannot be changed.